Labels: ,

Super Meaty Sausage Pizza


This is what happens when hubby and I make meals without planning. It is usually an overload of... something. In this case, toppings. But hey, I am not complaining. When it comes to pizza, I love my meat and mushrooms! 

By the way, if you look closely, you'd notice that one side has more meat than the other. Guess whose half that is!


What you need:

pizza dough
quarter of a pound cooked sausage meat
1/4 Vidalia onion, sliced
8 oz can of mushrooms
2 to 3 tablespoons tomato sauce
1 tomato, roughly chopped
slices of mozzarella cheese
dried thyme (to taste)
dried basil (to taste)
about 2 teaspoons salt
1 tablespoon Extra Virgin Olive Oil


What to do:

Preheat oven to 400°F. 

Prepare/knead dough according to package directions. Place on round baking pan and drizzle with olive oil. Using a pastry brush, spread the olive oil so it would cover the whole middle area. Sprinkle salt on the edges of the dough.

Spread tomato sauce on top of dough. Cover with mozzarella cheese slices.  Top with tomatoes, onions, mushrooms, and sausage. Season with thyme and basil. 

Bake for about 10 to 15 minutes, or until dough is cooked according to package directions. 


Tips, Tricks and Tweaks:

1. I used sweet Italian sausage in this recipe. Feel free to use the regular or spicy variety!
2. Dried oregano would be a nice touch to this dish.
3. No tomato sauce? Use spaghetti sauce! It works well too!

3 comments
Labels:

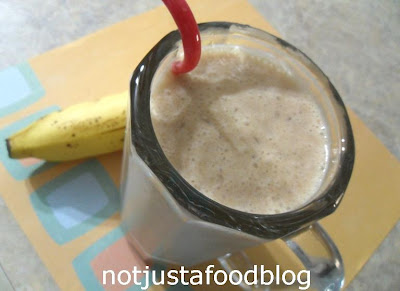
Banana PB&J Smoothie

 
I got (and tweaked) this delicious recipe from the April 2011 edition of Food Network Magazine. They featured 50 smoothies, and being a "smoothie girl" myself, I love trying different flavors. I have to say, this was one of the most delicious I have ever had. It was just so rich and filling. And I didn't feel guilty because it had banana and peanut butter. I thought of it as "drinkable breakfast."

By the way, you did not read the date wrong. The recipe was really from a 2011 edition. I have been a subscriber since 2010 (best gift that hubby ever gave me!) and I love their recipes and features. Being a subscriber, I also get my magazine before it hits the newsstands (e.g. I got my September issue on the first week of August!) so I get to make different holiday recipes ahead of time. I am hoping to get my October (Halloween!) issue in a few weeks, so I would have enough time to try out recipes and post some here in my blog.


What you need:

1 banana
1 cup 2% milk
1/4 cup creamy peanut butter
2 tablespoons strawberry jelly
6 ice cubes


What to do:

Easy peasy. Just put everything in the blender and blend until you get your desired consistency. 


Tips, Tricks and Tweaks:

1. Original recipe called for a frozen banana, soy milk and wheat germ. I just omitted and substituted.
2. Try raspberry or grape jelly for this recipe!
3. If you want your smoothie to be a bit thin (like I do!), add more ice.


5 comments
Labels:

Egg and Spinach Cups


Thanks to my friend Lyndee for inspiring me to make this delicious dish. She posted a similar dish on Facebook and it just made my mouth water - I just had to make it! And what great timing - my mother-in-law gave me a whole bag of fresh spinach. I was already imagining a great breakfast with these egg and spinach cups!

There is really no exact recipe for this dish. I just put in stuff that we like. You can always tweak yours according to what you feel like eating. I promise, it would always taste great!

By the way, my friend Lyndee is a very talented jewelry maker! Visit her shop here or here!


What you need: (for 6 egg cups)

6 large eggs
1/4 Vidalia onion
1/4 cup shredded Gruyere cheese
1 cup fresh spinach
2 tablespoons butter
salt and pepper, to taste


What to do:

Melt butter in a pan over medium heat. Add onions and cook until caramelized, stirring occasionally. Remove from heat and let cool.

Heat oven to 350°F.

Grease muffin pans with cooking spray. Place about 4 to 5 spinach leaves on the bottom of each cup. Crack an egg on the cups and season with salt and pepper. Place in the oven and bake for about 12 to 15 minutes, or until the eggs are set but not fully cooked.


Remove from the oven and top with grated gruyere and caramelized onions. Return to the oven and bake for another 5 to 8 minutes, or until cooked according to your desired doneness. Let cool before handling.


Remove from pan and enjoy!


Tips, Tricks and Tweaks:

1. It is important to grease the cups in this recipe - makes for easier egg removal!
2. Add anything you like - chopped chorizo, hotdog, bacon bits - the possibilities are endless!
3. Not a fan of gruyere? Use cheddar!


5 comments
Labels:

Fruit Bowl 2

pineapples, strawberries, blueberries and grapes

Sometimes, all it takes is a bowl of fruit to make me happy. ;-)


2 comments
Labels:

Kid-Approved Spaghetti


Here is a dish of spaghetti that son loved even though it had... (gulp!) mushrooms! The sauce was tasty enough to overlook the shrooms on the plate, and of course, the pound of sausage helped, too.

And to channel my inner Sandra Lee (haha), I used bottled spaghetti sauce for this dish. It is just easier and cheaper. I just had to enhance the flavor by adding some herbs from my garden!


What you need:

1 bottle (24 oz) spaghetti sauce (I used Barilla Montanara mushroom and garlic)
1 pound Kielbasa sausage, cubed
1/2 large Vidalia onion, chopped 
4 cloves of garlic, minced
2 carrots, cubed
1 tablespoon chopped fresh basil
1 tablespoon chopped fresh parsley
1 tablespoon extra virgin olive oil
1 bay leaf
salt and pepper, to taste
spaghetti noodles


What to do:

 Cook noodles according to package directions. Set aside.

In a  pot, cook the sausage over medium-high heat for about 2 minutes, stirring frequently. Add the olive oil, garlic, onions and carrots. Cook for about 2 to 3 minutes, then pour in spaghetti sauce. Add in bay leaf, chopped basil and parsley. Lower heat to simmer and let cook for 10 minutes.

Place noodles in a bowl and ladle sauce on top. Garnish with grated Parmesan cheese and more basil. 


Tips, Tricks and Tweaks:

1. If using dried herbs, only use about 1/3 of the amount of fresh herbs. 
2. Chop basil just before you add them in the dish. Chopping them too early would cause them to brown on the edges.
3. Add some button mushrooms for more flavor!
4. Don't rinse spaghetti with water after cooking. Rinsing would remove starch, which helps pasta absorb more sauce. I do recommend adding a pinch of salt to the boiling water!
 

6 comments
Labels:

Sago't Gulaman (Tapioca Pearls and Jelly Drink)


Since it is summer here and the heat is unbearable, I made this drink to cool me down. It just so happened that I found this pack of agar agar in my pantry while looking for something else. Winner! 
Agar agar in green

Before I wrote this post, I started doing some reading about agar agar. According to Encyclopedia Britannica, it is a gelatin-like product made primarily from algae. In the Philippines, they are sold in bar form, and when boiled, will resemble gelatin. Of course, Jell-O brand was also available, but agar (or "gulaman" in the vernacular) is cheaper and healthier - it is made from sea weeds. Or at least that was what we've been told. 

Tapioca Pearls from New York! ;-)
Anyway, I enjoyed this drink because I was able to make it to my preference. Growing up, when we would buy it from stores, it would be watered down and bland. Not good. This time, I had it a bit sweeter. Not the diabetes-inducing kind, but the mildly sweet and refreshing kind that is perfect for this hot summer day.


What you need: 

2 bars of agar agar
1 cup tapioca pearls
1/2 teaspoon of white sugar
1 cup brown sugar
1/2 teaspoon vanilla extract
water


What to do: 

Prep the agar agar by tearing it in small pieces and soaking it in cold water for a few minutes.

Meanwhile, cook the tapioca pearls by boiling them in about 2 cups of water for about 15 to 20 minutes, depending on the size of your pearls. If they start getting translucent (but you can still see a white spot in the middle), lower the heat to a simmer until they are completely translucent.

Transfer them to a fine-mesh colander and rinse with water to remove starch. Place in a container and set aside.

Heat 4 cups of water in a pot. Add the drained agar agar pieces and let dissolve over low heat. Add 1/2 teaspoon white sugar and cook, stirring continuously. Simmer for about 10 minutes, or until agar agar is completely dissolved. Strain and pour into a rectangular mold (or pan). Cool for about an hour, then refrigerate until set. Before using, remove from mold and cut into small squares. 

To prepare the syrup, combine brown sugar and water in a pot over low heat. Add in vanilla extract. Stir every few minutes so sugar won't stick on the bottom of the pot. When sugar is completely dissolved, remove from heat and let cool.

To make the drink, spoon some tapioca pearls and agar agar into a tall glass. Add about 4 tablespoons of syrup and water. Enjoy!


Tips, Tricks and Tweaks: 

1. Add less water or more syrup according to the sweetness you prefer.
 2. For a really cool drink, top the pearls and agar with shaved ice, then pour syrup in it. Voila!

2 comments
Labels:

Salmon with Pasta and Capers


I have wanted to recreate this dish since the day we had it. We first had this in a place called Panash in Hong Kong. Oddly, it was a bakery and cafe, but their dishes were just sooo delicious.  

Hubby ordered "3 Brothers Burgers," so called because every burger has a different kind of patty. One was regular beef burger, the other one was fish, and the third was chicken. They were all paired with sauces that would complement the flavor of the patty.

Panash (HK) food trip

It was very good, but MY order took the spotlight! If my memory serves me right, I think it was called "Angel Salmon." Basically, it was smoked salmon with pasta and capers in white sauce. I think it was the capers that made this dish so flavorful. I wouldn't eat capers by itself (I think they're too salty and taste like pickled olives), but in a dish, they are excellent!

I tried best I can to re-create the Angel Salmon by memory (and taste), and this is what I came up with. Not the exact thing, but darn close! One big difference is that they smoked their salmon. Mine was just pan-fried in a bit of butter. But the result was amazing! I felt like I was back in Panash again - minus the harrowing plane ride!
Salmon is at peak so they are cheaper than normal!

What you need: 

about a pound of salmon (fillet)
1 1/2 cup evaporated milk
4 to 6 tablespoons of butter
2 cloves of garlic, minced
1/4 Vidalia onion, minced
3 tablespoons sweet white wine (I used Riesling) 
2 tablespoons chicken broth
1 1/2 to 2 tablespoons capers
angel hair pasta
salt and pepper, to taste

What to do: 

Cook noodles according to package directions. Set aside.

Melt 4 tablespoons of butter in a pan over medium heat. Saute garlic and onion. Add more butter if it looked dried out. Add capers with a little bit of juice from the jar (about a teaspoon or so). Let cook for about 30 seconds, then add milk, wine and broth. Season with salt and pepper. Remove from heat and add cooked noodles.

Meanwhile, heat a tablespoon of butter in a skillet and pan-fry the salmon according to desired doneness. 

Place some noodles on a bowl and top with cooked salmon. Enjoy!

Hubby had his with tomatoes

Tips, Tricks and Tweaks: 

1. Add more butter if the butter dries up after sauteing (onion tends to suck up all those buttery goodness!).
2. Aside from Riesling, you can also use Chardonnay or Moscato. Or regular rice wine!
3. As always, you can add or take away the amount of any ingredient (such as capers), depending on how you like it.


5 comments
Labels:

Sweet Glazed Ham


This ham is just sooooo good! I helped my mother-in-law prep it by spreading the glaze (yep, that was my part!). 

We used the Boar's Head Brown Sugar and Spice Glaze and Boar's Head Ham to make this delicious combo. Nope, not a sponsored post. We just love Boar's Head. It is so worth paying the extra money to have this good quality meat.


Anyway, we basically followed what it said in the bottle of the glaze. The result was a delicious sweet and savory ham that we enjoyed for lunch, plus several sandwiches afterwards.  


6 comments
Labels:

Tropical Dump Cake


One evening, I invited my in-laws over to have dinner in our house, and my mother-in-law suggested that we have "Dump Cake" for dessert. It was the first time I have ever heard of it in my entire life, and the images that danced in my mind weren't very pleasant. The first words that came out of my mouth was, "uhhh.... DUMP cake?" And my mother-in-law said, "yes, it is called dump cake because you dump together all the ingredients. It's very easy."

So after showing me the recipe and how to make it - which was indeed easy because all you have to do is dump everything in a crock pot - I was sold! Actually, I was told that dump cake is traditionally baked in an oven like a regular cake. But since this is my first dump cake, I am thinking that I would forever make it in a crockpot. ;-)

Fair warning - this cake is highly addictive because of all the sugar, butter, and syrup in it! But these ingredients are what makes it taste so AWESOME! 

Recipe adapted and tweaked from here.


What you need:

5 packs (3.75 oz each) fruit cups in juice (tropical fruits)
2 teaspoons cornstarch
1/4 cup packed brown sugar
1 cup butter, softened (not melted)
1 box yellow cake mix (I used Betty Crocker)


What to do: 

Grease your crock pot by spraying it with cooking spray. Reserve 1/2 cup of juice from the fruit cups; pour the remaining juice and fruits in the crock pot.

Tropical fruits galore!

In a small bowl, combine the reserved fruit juice and corn starch. Mix well. Pour the mixture in the crock pot and stir.

Sprinkle brown sugar, then the cake mix on top of the fruits. Cut butter in small pieces and place over the cake mix. Make sure all parts are covered with these ingredients!

Cover and cook on low for about 3 hours, or until cake is set when lightly touched in the center. Spoon warm cake into dessert bowls and top with fruit mixture. Enjoy!


Tips, Tricks, and Tweaks: 

1. You can also do this recipe using just one kind of fruit - say, peach. Or blackberries. Or pineapples. You get the drift.
2. A sprinkle of cinnamon with the brown sugar would be very good, I imagine.
3. As I have mentioned above, you can make this cake in an oven if you don't have a slow cooker.


4 comments
Labels:

White Pork Afritada


Yet again, this dish was inspired by Kuya Dennis' post. I love how he would take traditional dishes and tweak it to make a new dish. I always trust his recipes because he has three kids as taste-testers!

I also did some tweaking of my own. I used pork instead of chicken, and since I don't have cream in the fridge, I used evaporated milk. That has always been my go-to ingredient because it makes everything creamier, and it is so easy to stock because of its long shelf-life. And since hubby is in his "olive cravings," I had to put in some olives.

This dish was really delicious. Very flavorful and savory, with a little hint of creaminess. I also didn't feel too guilty eating it, because I loaded it with a lot of veggies. Healthy and yummy!


What you need: 

1 pound pork shoulder, cubed into bite-size pieces
1 Russet potato, wedged
1/2 cup frozen peas, thawed
2 cups baby carrots
1 green bell pepper, diced
1 1/2 cups beef broth
1/4 Vidalia onion, sliced
3/4 cup evaporated milk
4 cloves of garlic, minced
1/4 cup Spanish olives, drained
1 tablespoon of butter
salt, to taste


What to do: 

In a pan, heat butter over medium-high. Saute garlic and onion. Add cubed pork and cook, stirring until brown (about 2 to 5 minutes, depending on how thick the cuts are). Add carrots and potatoes, then pour in broth. Bring to a boil, then set heat to low. Let simmer for around 10 minutes, or until pork and veggies are tender.

Add the rest of the veggies, and the evaporated milk. Season with salt. Continue cooking for about 5 more minutes. Serve hot.


Tips, Tricks and Tweaks: 

1. No broth? Use bouillon cubes instead. Or just water will do.
2. You can also make this recipe using chicken.
3. Make sure veggies are relatively the same size for even cooking.
4. Not a fan of evaporated milk? Use cream or regular milk instead.


5 comments
 
Not Just A Food Blog © 2012 | Designed by Canvas Art, in collaboration with Business Listings , Radio stations and Corporate Office Headquarters