Labels:

Tofu with Mushroom Sauce


It was a Japanese night for us. Not intentionally, though. I didn't know what to cook and we definitely didn't want to have ham again for the nth time in a row (leftover from Christmas dinner, mind you!). So I looked in the fridge and saw a block of tofu and a few pieces of mushroom. Easy. Stir Fry. But I saw a great recipe online that would make use of other "stuff" I had in my pantry. And by "stuff" I mean ingredients we rarely use and I only remember when I clean out the pantry. So I decided to try it.

Of course, I had to tweak it and use whatever I had (I wasn't in the mood for a quick run to the grocery store). I am pleased to say that it turned out great. No - it was awesome! The combination of flavors went very well together. In fact, when we ran out of fried tofu, hubby got some rice and mixed the sauce with it.

On a humorous note, I used powdered dashi mix, and I had to guess the ratio of water to powder mix because the instructions were in Japanese! There was a note on the front of the box that said "directions on the back panel," but lo and behold - they were written in Japanese. Hahaha. It did say 2 teaspoons (or whatever) of powder mix, but how much water? I had to go by taste.

Click for larger image

Ummm...

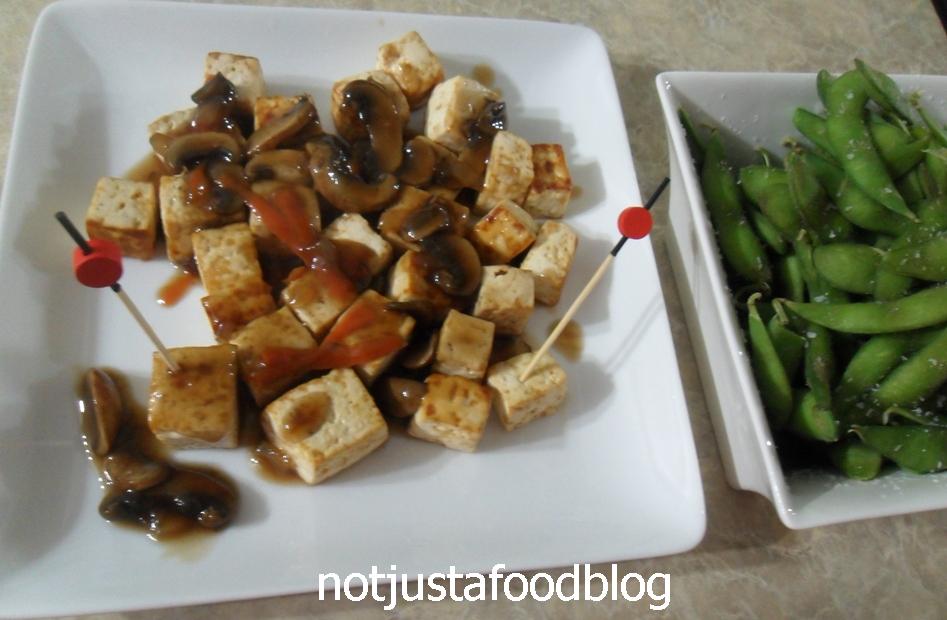
As with the edamame, it was also by chance that I saw a bag of them in the freezer. Well, what could go well with a block of soy but... more soy! But seriously, if you haven't had edamame, you are missing out! They taste so good - like peanuts, only better. They are also chockful of nutrients. 

So there you go. Our Japanese dinner. And as Kevin Brauch would say, "Konbanwa!"


What you need: 

1 block of tofu
6 oz baby bella mushrooms, sliced
1 teaspoon dashi mix
3/4 cup water
1 1/2 tablespoon soy sauce
1 tablespoon mirin
1/8 cup of shaved carrots
2 tablespoons Vidalia onion, minced
1 tablespoon cornstarch dissolved in 1 tablespoon water
Canola oil for deep frying


What to do:


Drain tofu and wrap in several layers of paper towel to absorb extra water. Set aside.

In a small saucier over medium-high heat, combine water, dashi mix, mirin and soy sauce. Bring to a soft boil, then add carrots, onions and sliced mushrooms. When it starts boiling again, pour in the cornstarch-water mixture and stir. Lower heat to a simmer and continue cooking for about 2 minutes.

Meanwhile, slice the drained tofu into 1 inch cubes and deep fry in hot oil until lightly browned. Place fried tofu in a serving platter and generously drizzle with mushroom sauce.


Tips, Tricks and Tweaks: 

1. Firm tofu works best in this dish.
2. Original recipe called for katakuriko (potato starch). I used corn starch.
3. Hubby suggested adding more veggies like baby corn and water chestnuts for texture.
4. I used shaved carrots because I didn't feel like cutting it very thin with a knife.


Happy New Year!

3 comments
Labels:

Shish Kebab with Tahini Sauce


The term "shish kebab" is a Turkish word that means "skewer" or "roast meat." Over the years, it has included roasting veggies to add more flavor and variety to the dish.

In Filipino, food skewered on a stick is generally referred to as "barbecue," but it is usually pork or chicken rather than beef. 

Truth be told, I made this dish because I don't want to waste the tahini we bought  when we made hummus. It went very well with the meat, and made the dish really delish!


What you need:

For the kebab
1 lb sirloin, cut into 1-inch cubes
1 large onion, cut into wedges
1 red bell pepper, cut into squares
3 cloves of garlic, crushed
1/4 cup lemon juice
2 tablespoon + 1/2 tbsp canola oil, divided
1/2 teaspoon kosher salt
1/4 teaspoon ground allspice
1/8 teaspoon ground cinnamon

For the tahini sauce
1 clove of garlic, finely minced
dash of salt
1/4 cup Tahini
3 tablespoon lemon juice
1 1/2 tablespoon water


What to do: 

Prepare the dish by combining garlic, lemon juice, 2 tablespoon oil, salt, allspice, cinnamon and pepper in a large ziploc bag. Place the beef and marinate in the fridge for at least 2 hours.

Meanwhile, prepare the sauce. Mash garlic and salt in a bowl using the back of a spoon until paste forms. Whisk in tahini, lemon juice and water. Refrigerate prior to use.

Preheat grill to high. Remove beef from the bag and discard the marinade. Brush onion wedges and bell pepper pieces with oil. Thread beef slices onto skewers, followed by the veggies. Grill for about 5 minutes, or until desired doneness. Serve with tahini sauce.


Tips, Tricks and Tweaks: 

1. Traditional shish kebab has a lot more spices - coriander, paprika, cumin, etc. I just used the ingredients that I thought would suit our taste buds.
2. Make sure the beef cut is tender - chewy meat is not "good eats".
3. Not a fan of tangy sauces? Reduce the amount of lemon juice to half.

6 comments
Labels:

Christmas 2011

A simple cake for HIS birthday

Happy Birthday, Jesus! YOU are the reason for this season.

Isaiah 9:6 For to us a child is born, to us a son is given; and the government shall be upon his shoulder, and his name shall be called Wonderful Counselor, Mighty God, Everlasting Father, Prince of Peace. 

Merry Christmas!

8 comments
Labels:

Easy Peppermint Hot Chocolate


Son likes anything mint, and his new (seasonal) favorite is the Peppermint Hot Chocolate from McDonald's. Well, I found myself having some leftover candy canes and peppermint candies from one too many Christmas parties, so I thought I'd treat son to a (semi) homemade drink. Boy, did he love it! He was able to control the flavor (more mint!) and had a lot more "extras" in his drink.

Yet again, this is semi-homemade (hence the word "easy" in the title) because I used ready made chocolate drink mix. But son didn't mind. He was just too happy with his drink - it was like drinking milk and eating candy at the same time!


What you need:

1 package(1.25 oz) chocolate powder mix (I used Swiss Miss Dark Chocolate Sensation)
1 1/2 cups milk
1/2 teaspoon pure peppermint extract
dollop of whipped cream
1 teaspoon crushed peppermints
handful of chocolate chip morsels


What to do: 

Place milk in a cup and heat in the microwave for about 2 minutes. Add chocolate mix powder and mix well. 

Pour in peppermint extract and stir. Top with whipped cream. Garnish with crushed peppermint, chocolate chips, and candy cane.


Tips, Tricks and Tweaks: 

1. I thought I put too much peppermint extract, but son said it actually needed more. You can tweak the amount according to your preference.
2. Use Reddi Whip instead of whipped cream. It would also make a prettier picture.

1 comments
Labels:

Reindeer Noses


 These adorable Reindeer Noses are the handmade gifts I gave to friends this year. Actually, it is semi-homemade, since I just bought the candies and packaged them. I got the idea from here, and I thought it was great! I don't have a special Rudolph stamp, but I think my Holiday Lineup stamp worked well. I also love that all of Santa's reindeers reindeer are complete in this stamp, and that they are giving Rudolph that funny look. It added a humorous touch to the gift.


Pardon the crude coloring, I just used regular colored pencils for this project. I also used a distress technique to produce an "aged" look on the paper.

The brown candies were dark chocolate malt balls. They were soooo delicious! Of course, I had to do some "quality control" so I ate the mis-shapen ones. The red candy was either a gumball or Red Hots. 

It was fast and easy, especially compared to my original plan to give away Cake Pops. And so cute, too! 

4 comments
Labels:

Panang Chicken Curry


I have to admit - I didn't know the difference between regular curry and panang curry prior to writing this post. All I know is that everytime I see panang duck on the menu, I have to order it. Panang's flavor (at least to me) seems to be richer and deeper.  As with the duck, well... it's just my favorite meat to go with it.

After some research, I found out that they both have the same predominant ingredients - dried chilis, coriander, cardamom, lemon grass, garlic, etc. However, panang contains cumin, green peppers, mace, and others not found in red or yellow curry.

Hubby surprised me with several cans of panang curry when he went to the Asian store and I was excited to use it. What he got me was in paste form, but truth be told, I have never seen panang curry powder before. I am sure it exists, but I don't know where to buy them. I prefer the paste anyway. 

And since I have not fully recovered from our adventure with Mr. Duck, I opted  to use chicken instead. It turned out delicious, not quite restaurant quality, but close enough for home consumption. :-)


What you need:  

1 lb chicken breast, cut into bite-size pieces
1 carrot, coined
1/2 red bell pepper, cut into strips
1 can (15 oz) coconut milk
3 tablespoons Panang curry paste
1 tablespoon fish sauce (patis)
1 tablespoon sugar
1/4 cup Thai basil
2 teaspoons Canola oil


What to do: 

Heat Canola oil in a wok over medium-high. Add in the chicken and cook until brown, about 3 to 5 minutes. Pour in about 2 tablespoons of coconut milk and bring to a boil. Add 1 tablespoon of Panang curry paste and stir well.  Let cook for about a minute.

Add the remaining coconut milk, curry paste, fish sauce, sugar, carrots, and bell peppers. When it boils, lower heat to a simmer. Cook for 10 minutes, or until chicken is tender. 

Add basil then turn off heat. Serve with hot rice.


Tips, Tricks and Tweaks: 

1. When browning chicken, stir constantly. Otherwise, the chicken would stick to the bottom of your pan.
2. Use regular (sweet) basil if you don't have Thai basil.
3. Want more heat? Add more curry paste.
4. ALWAYS wash your hands after handling poultry to avoid cross contamination. Use a separate cutting board for chicken!
5. If you don't like fish sauce, substitute with salt. 

1 comments
Labels: ,

Arroz con Pollo Valenciana ala Columbia


I was amazed when I saw this recipe online. And from the website of Columbia Restaurant itself! I felt that it was very generous of them to share the recipes of their delicious fares online. 

My family loves Columbia restaurant. We have been to three of their seven locations, and all of them are quite phenomenal. Our favorite, though, is the historic Ybor City branch where they feature Flamenco dancers every Monday to Thursday at 7:30pm. But of course, we don't go there for the dancing. We go there for the food!

Anyway, I was thinking of making regular Yellow Rice and Chicken, but I didn't have saffron, so I took the short cut again - using pre-packaged yellow rice. As I was browsing for recipes online, I stumbled at Columbia's recipe, and decided to copy bits and pieces of it. I was really excited, the prospect of making those delicious recipes in my kitchen was just too much! A serving of Arroz con Paella Valenciana at Columbia is $24.95 (not including tax and tip), but I could make it at a fraction of the cost at home.

And as expected, it was delicious!!! All that was missing was the Flamenco dancers, the fine ambiance and the polite waiters. But even though the restaurant's recipes are online for home cooks to reproduce, I still encourage you to try Columbia Restaurant's authentic Cuban dishes. No, this is not a sponsored post. I just happen to like the resto and am spreading the love. :-)

P.S. Don't forget to try their Boliche Criollo and 1905 Salad!


What you need:

1 pkg (16 oz) Vigo yellow rice
4 cups chicken broth
1 lb chicken breast, cut in cubes
4 pieces chorizo, coined
1 green bell pepper, sliced
1/4 Vidalia onion, sliced
3 cloves garlic, minced
1/4 cup peas
1 tomato, sliced
2 tablespoons white wine
pinch of salt
1/2 tablespoon extra virgin olive oil


What to do: 

Cook yellow rice according to package directions. However, substitute water with chicken broth.

Heat olive oil in a wok over medium-high. Saute garlic and onion for about a minute. Add chicken and continue cooking until chicken starts to brown. 

Add the bell pepper, peas, tomato slices, and chorizo. Season with salt. Pour in the white wine, and cook for another five minutes, stirring constantly. Transfer the cooked rice to the pot and mix well. Serve hot.


Tips, Tricks and Tweaks: 

1. Original recipe called for asparagus tips, and roasted red bell pepper. I tweaked my recipe.
2. Substitute chorizo with smoked sausage.
3. Since you are dealing with poultry, cross contamination may happen. Make sure you always wash your hands when handling raw chicken, and use a separate cutting board that you use ONLY for chicken.

4 comments
Labels:

Fish Tacos


Most of the dishes I cook are spurred by cravings. Hubby was craving for fish tacos, which made me want some too, so we decided that we were gonna have fish tacos this week. And for an added bonus - I got the taco shells (whole grain, of course!) for FREE because of an awesome coupon from an awesome friend. 

I almost didn't get a picture of this dish because I wanted to eat it as soon as I finished clumsily assembling it. Oooh, it was good.

Ãœber Close up!

What you need: 

2 mahi-mahi filets
2 teaspoons Canola oil
1 avocado
1 lime

1/4 cup red onion, chopped
1/4 cup cilantro, rinsed (leaves only)
2 tomatoes, chopped
3 stalks green onion, chopped

For the dressing:
1/4 cup Canola oil
juice of 1 lime
1 teaspoon red pepper flakes
1 tablespoon honey
salt and pepper, to taste


What to do: 

Combine all the ingredients for the dressing. Mix well. Set aside.

Heat oil in a frying pan over medium-high. Lightly fry the fish, making sure not to overcook it. The best way to tell is when the edges have browned, but the meat is still flaky and moist. When the meat has cooled, cut it into thin slices. 

Assemble your taco. Place a soft shell on a plate and lay the fish slices. Drizzle with the dressing. Layer the tomatoes, onions, cilantro, and avocado on top of the meat. Squeeze some lime over the taco before serving and enjoy!


Tips, Tricks and Tweaks: 

1. Any kind of white, firm-fleshed fish will do!
2. Try marinating the fish with a little bit of the dressing for a few hours prior to frying.
3. If you don't like tangy dressing, reduce the amount of lime juice and add more honey.
4. Adjust heat by adding more red pepper flakes.

4 comments
Labels:

Cake Pops


Pardon the "sweaty" look. I just took it out of the fridge!

I made some cake pops since I was thinking of gifting them to friends for Christmas. I love handmade gifts, and I thought these would be such a great idea. However, I have encountered some difficulties in making this first batch of cake pops. 

First, the cake I bought was the moist kind. Which is really, really good when you eat it immediately. With making cake pops, I had to freeze it for a few hours so it would hold its shape and stay on the stick. 

Second, even after freezing, it was still a challenge to coat it with chocolate while remaining on the stick. 

The taste was excellent, but I have to make some major tweaks with my technique. Maybe use regular cake mix instead of the moist kind? I will try it and will let you know the outcome. In the meantime, enjoy the recipe of my moist cake pops! :-)


What you need:

1 box cake mix (I used Betty Crocker's Super Moist White Cake Mix)
oil, water and eggs called for in the cake recipe

8 oz cream cheese frosting (about half a tub)
1 cup semi-sweet chocolate morsels
1 tablespoon oil
candy sprinkles, nonpareils, and other decors
sticks


What to do:

Bake cake according to package instructions. Set aside to cool.

When the cake has completely cooled, slice the cakes in small squares and crumble them completely. Place the crumbled cake pieces in a large bowl. Add cream cheese frosting and blend well (using your hands, of course). 

Prepare a sheet pan lined with parchment or wax paper. Gather about a tablespoonful of cake and shape it in a ball. Place on the sheet pan. Repeat the process until you have used up all your cake. Refrigerate (or freeze!) for at least 2 hours.


Meanwhile, prepare the chocolate. Place the morsels on the top part of a double boiler and melt. Or, you can put it in a mini Crockpot just like I did! Add the tablespoon of oil and mix well.


Have a stick ready by dipping the top end in chocolate. This is so the cake would stay put when the chocolate at the end of the stick hardens. Poke the cake ball with the stick, making sure the stick doesn't go through! Dip the cake ball in the chocolate and slowly rotate to remove the excess chocolate.

Stick the cake pop in a styrofoam square to keep it upright. While the chocolate is still wet, sprinkle the top with nonpareils or candy sprinkles. Repeat until you have used up all your cake balls.

If you are planning to give it as a gift, wrap in a clear plastic with a pretty bow. :-)


Tips, Tricks and Tweaks: 

1. You can make cake pops from scratch (not from a box). It is just easier and I didn't wanna mess up with that (hahaha).
2. Cake pop makers can be purchased from stores - but the pop itself is pure cake - no cream cheese frosting to hold it.
3. Not a fan of cream cheese frosting? Try buttercream.
4. If you don't have a double boiler or mini crockpot, just zap the chocolate morsels in a microwave for a few seconds. If it hardens, just re-zap it!
5. Consume immediately! I noticed that after a week in my fridge, the cake pop went through the stick! Too dense, I suppose.


6 comments
Labels:

Product Review: Nonni's Biscotti Turtle Pecan


I am in denial. I keep telling myself that I don't like caramel, but I find myself eating (and enjoying) a lot of products with caramel. For instance, I cannot resist Twix bars, DeMet's Turtles, and I am certainly loving this new Turtle Pecan biscotti from Nonni's.

While son sticks with the tried and tested Cioccolati flavor, I love branching out and trying new variants. Out of all that I have tried, I think I like this Turtle Pecan the best. Read on to know why.


What I liked: 

- Individually wrapped, Nonni's style. I like it that way -it kinda' tells you that the product is always fresh.
- The thick layer of milk chocolate on the bottom in always a plus.
- The chewy caramel chunks in the cookie. Ooooh, it is just delish! 
- Only 110 calories per serving. Yipee!


See the circled part? That's the yummy caramel!


What I didn't like: 

- Hard to find! Unlike the "Originali" and "Cioccolati" variety which are always in the aisles.
- A bit pricey. About $4 for a 6-pack. (But I got mine on BOGO so yay!!!)


The Verdict:

It's really hard not to love this product. It is absolutely delicious and very well-balanced - not overly sweet and not bland at all. Just the light, perfect yumminess that would go well with your morning joe. And 110 calories a piece! My (supposedly) healthy cereal has 160 calories with FAT-FREE milk! I would gladly indulge on that sumptuous biscotti! So yes, this product is highly recommended. And I would buy it again - if they put it on sale (or if I have a coupon). 

0 comments
 
Not Just A Food Blog © 2012 | Designed by Canvas Art, in collaboration with Business Listings , Radio stations and Corporate Office Headquarters