Labels: ,

Tortang Talong (Eggplant Omelette)


I had to drive a long way just to get these Japanese eggplants. See, I have been craving for tortang talong (eggplant omelette), but it doesn't seem right to make it with the eggplants aubergines that are available in the local markets here. They are either humongous and fat, or pudgy and fat. They probably taste the same, but I didn't think I would have the right meat-to-eggplant ratio if I use them. 

So when I saw these Japanese eggplants in the Oriental store, I grabbed a pack of 3. I figured I could finally have my omelette, and possibly an extra piece to grill (another one of my favorites!).  

This recipe of eggplant omelette is easy to make and delicious. Dipped in (banana) catsup, it "hits the spot!"


What you need:

2 eggplants
1 pound ground pork
2 eggs
1/2 green bell pepper
1/4 of a large Vidalia onion
5 cloves of garlic, minced
1 tablespoon soy sauce
salt and pepper, to taste
olive oil (for frying)


What to do:

Grill eggplants until skin is almost burnt and peeling off. Let cool on a rack. When it is cool enough to touch, remove skin. Flatten the grilled eggplant with a fork.


In a flat container, beat the eggs. Season with a bit of salt and pepper. Lay the flattened eggplant on top of the beaten eggs.


Meanwhile, heat about a teaspoon of olive oil in a wok. Saute garlic, onion and bell pepper. Add ground pork and cook till brown. Season with soy sauce. Set aside.

Heat a large flat pan over medium-high. Add about a tablespoon of olive oil. Remove eggplant from beaten eggs and place into hot oil. Put some of the ground pork mixture on top of the eggplant. Cook for about a minute or two, then turn over so the other side would be cooked. Remove from heat. Enjoy with hot rice and your favorite condiment.


Yes, this is how your pan would look like too! ;-)

Tips, Tricks and Tweaks:

1. Do not cut off the top of the eggplant. It is actually very useful in handling and transferring the eggplant!
2. Use a wide spatula to put the flattened eggplant into the pan. 
3. Don't flatten the eggplant too much. You're making omelette - not baba ghanoush!
4. Eggplants tend to soak up a lot of oil so don't use a lot!

6 comments
Labels:

Chicken Updates

Time for some chicken updates! As of today, we think we have 5 layers. It is very exciting to go to the coop to collect eggs! These chickens are hilarious - watching them is so much fun! There's really never a dull moment in the ranch!

These hawks are always flying around. Makes me nervous, actually. I am afraid they would swoop down and snatch one of the chickens!


Funny picture taken by hubby. It looks like the chicken wants to be in the frame!


The ladder provides them with exercise and entertainment! In this picture, she's showing everyone who's "top chick."


This is how they get up in the morning. They make a beeline for the door and start the day!

3 comments
Labels: ,

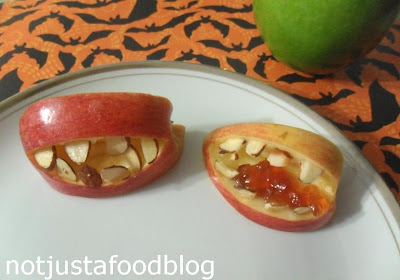
Scary Apple Mouths


How funny is it that after posting some cute smiling apples, I am now doing Scary Apples! Of course it helps that apples are in season and are cheaper than normal! 

Anyway, I thought the idea was cute when I saw it on the October 2012 edition of Food Network Magazine. And since I have all the ingredients, I gave it a try!


What you need:

1 apple
about a tablespoon of sliced almonds
strawberry jelly (optional)
lemon juice (optional)


What to do:

Cut a red apple in quarters and brush with lemon juice. Cut out a wedge from the skin side of each piece. Fill with strawberry jelly and insert sliced almonds to resemble teeth.


Tips, Tricks and Tweaks:

1. Original recipe called for peanut butter, but I opted to use strawberry jelly.
2. Don't have sliced almonds? Try pepitas (squash seeds).
3. Lemon juice is used so the fruit won't brown easily. You can skip it, but you have to eat the fruit almost immediately.


1 comments
Labels:

Smiling Apples


Thanks to my friend Peachkins for this cute inspiration! I told son that we were gonna make smiling apples with marshmallows and peanut butter but he had a different idea - he wanted caramel instead!

So I put a little twist in my smiling apples and used caramel butterscotch topping and it turned out extremely good. Well, maybe just a bit sticky and hard to eat since the darn marshmallows kept sliding! I am thinking that had I used real caramel instead of  syrup, it would have better in keeping the marshmallows from sliding. But I didn't want to buy caramel just for an afternoon snack. I would save that for when we make caramel apples again.  

Oh, and here is a link for Peachkin's cute creations!


What you need:

1 apple
about a cup of marshmallows (regular-sized)
squirts of caramel or butterscotch topping


What to do:

Wash the apple and dry with paper towels. Slice in thin wedges.

Place a wedge of apple on your plate, then squirt a small amount of butterscotch syrup on the side facing you. Immediately line marshmallows on top of the syrup.

Get another wedge of apple and put butterscotch syrup on the bottom side. Place it on top of the marshmallows to resemble a smile.

Continue doing procedure until you run out of ingredients (or patience!).


Tips, Tricks and Tweaks:

1. I used Red Delicious apples because the color resembles human lips. Feel free to use any kind!
2. To avoid apple discoloration, squeeze some fresh lime or lemon juice on them.
3. Use real caramel or peanut butter to make the marshmallows stick.

P.S. It is almost Halloween! Head out to my shop to get your Halloween cards!


4 comments
Labels: ,

Capellini with Vodka Cream Sauce


So we were in the supermarket the other night and I saw hubby looking at a bottle of vodka sauce. It was rather interesting, I have never heard of "vodka sauce" in my whole life, and looking at the bottle, I thought it looked like crab fat (aligue). It was orange-y in color, not your typical red spaghetti sauce.

Needless to say, we were cooking it a few days later. Hubby just wouldn't stop talking about it (I promise, he was relentless) and I was also curious of the taste, so it was a win-win.

It was really delicious - and it reunited me with one of my favorite ingredients - shrimp! Yes, we are having shrimp again (cue music: O happy day!). Our self-imposed seafood ban has been lifted and I am now a happy camper! But enough about the shrimp - the sauce of this dish was the real star of the show. Try it! 


What you need:

1/4 of a large Vidalia onion, chopped
4 cloves of garlic, minced
3 tablespoons extra virgin olive oil, divided
1 cup Vodka

1 cup chicken broth
1 (28 oz) can crushed tomatoes
1/2 cup heavy cream
dash of red pepper flakes
1/2 pound shrimp, peeled and deveined
salt and pepper, to taste
fresh basil for garnish
cooked capellini (angel hair pasta) 


What to do:

Heat olive oil over medium heat in a pot. Saute garlic and onion for about a minute, then very slowly pour in the vodka and simmer over low heat. When vodka is reduced to half the amount (about 2 to 3 minutes), add chicken broth and cook for about a minute. 


Add in crushed tomatoes, whipped cream, then season with salt, pepper, and red pepper flakes. Let cook for another 2 to 3 minutes, or until heated through.

The heavy cream gives the sauce its orange-y hue
Meanwhile, cook pasta according to package directions. Drain and set aside.

Saute shrimps in 1 tablespoon of extra virgin olive oil over medium heat until they turn pink. Set aside.

Place cooked noodles into plate. Top with vodka sauce. Garnish with shrimps and freshly torn basil. 


Tips, Tricks and Tweaks:

1. Try using scallops or Italian sausage instead f shrimp.
2. There are so many ways of cooking this, some even add vodka after tomatoes and such. I prefer to cook it this way so as to cook off most of the alcohol content in the vodka.
3. This would also be good with penne or other thicker type pasta.
4. If you let the sauce simmer longer, it would be more flavorful!


5 comments
 
Not Just A Food Blog © 2012 | Designed by Canvas Art, in collaboration with Business Listings , Radio stations and Corporate Office Headquarters