Labels:

Worker Bee

A bee on my Wisteria flowers. 

I risked life and limb to take that picture. Those bees (there were more than one flying around) were HUGE - about as big as my thumb! After a couple of shots, the bee flew to my direction so I scampered away! ;-)

4 comments
Labels:

Cola-Marinated Beef


A trip to a local breakfast diner inspired me to make this dish. I ordered their Sirloin Tips and Eggs and it was delicious! There was a certain sweet undertone that I couldn't quite figure out so I brazenly asked the server what the ingredients of the dish were (yeah, I was THAT interested). The (not so) secret ingredient was cola - he said that the meat was marinated in it. Of course, the little light bulb in my head went off, and as we headed out of the diner, I was already thinking of how I could re-create that dish. 

I scoured the web for many recipes (I even looked at the Top Secret Restaurant Recipes cookbook) and tried to imagine a hundred different combinations. I ended up with this, and though it didn't taste exactly like what I had in the diner, hubby and I still enjoyed it nonetheless. I have to say, though, it was better as a left-over as the flavors had more time to infuse and really make this dish so yummy.


What you need:

1/2 pound top round steak
8 cloves of garlic (crushed), divided
1/2 Vidalia onion, sliced
8 oz baby bella mushrooms, sliced
1 1/2 tablespoon oyster sauce
1 tablespoon extra virgin olive oil
1 tablespoon butter
1/2 can soda (I used Coca-Cola)


What to do:

Slice beef in thin strips. In a bowl, combine beef strips, soda, and 3 cloves of garlic. Seal tightly with plastic wrap and marinate overnight in the fridge.

Place a wok or pan over medium-high heat. Add olive oil and butter. Saute the remaining garlic and onion for about a minute. Add the mushrooms and cook for 3 to 4 minutes. Put in the marinated beef and cook for 5 minutes, stirring occasionally. 

Season with oyster sauce and cook for 15 to 20 minutes, or until beef is tender. Serve with fried eggs.


Tips, Tricks and Tweaks: 

1. It does not have to be top round steak - use any cut if beef! Just make sure it is tender.
2. If the taste of soda is too strong for you, add about 1/4 cup beef broth or water.
3. Serve with noodles! Yummy!
4. No need to save the marinade - if done correctly, the beef will be juicy when you cook it!


3 comments
Labels: ,

Bacon-Maple Bar

They don't look very pretty, but they're so delish!

This was another accidental dish as Hubby was just munching on some cashews and realized that they were too salty, so he made cashew butter instead. We already have a recipe of cashew butter here, but the one we made today turned out to be different (cashew too salty) so we tweaked it. 

I trust Hubby when it comes to anything sweet (that is his forte), as sugar is the main staple in his diet. I am still trying to convince him that sugar is not an actual food group (or if it is, don't tell him!).

We countered the saltiness of the cashew nuts by adding maple syrup (and wildflower honey) to the crushed nuts. And because of the maple syrup, hubby thought it would go well with bacon or any other breakfast-related items. Hence, the Bacon-Maple Bar was born. ;-)

I didn't want to partake at first, as it didn't look so appetizing to me, but one bite and I was hooked! It was really delicious - the saltiness of the bacon, nuttiness of the cashew, and the deep sweetness of the drizzled maple syrup was just wonderful! This is breakfast and dessert rolled into one!


What you need:

2 cups roasted cashew nuts (salted)
3 tablespoons wildflower honey
1 tablespoon maple syrup
1/3 cup peanut oil
3 strips (or more) of cooked bacon


What to do: 

Start by heating the honey in a microwave-safe bowl for about 15 seconds. This is so the honey would be a bit runny and easier to mix in. After heating, add in the peanut oil and set aside.

Place the cashew nuts in the food processor, cover, and pulse for about 5 to 10 seconds. Continue doing so, while slowly drizzling the oil-honey mixture. Process until it is smooth. Add more peanut oil if it seems thick.

Slather on top of cooked bacon and drizzle with more maple syrup. Enjoy!


Tips, Tricks and Tweaks: 

1. Taste would depend on a lot of factors. If using unsalted roasted nuts, add about a teaspoon of salt. Tweak honey/syrup amount according to your preference.
2. We used real maple syrup. Not sure how artificial maple syrups would taste.
3. Less is more. Start with a little bit, mix it, taste it. Tweak, and continue until desired taste is acquired.

3 comments
Labels: ,

Beef Stroganoff


I love the versatility of Beef Stroganoff - you can use it with practically any type of pasta, and the ingredients are very simple. It is always a "go-to" dish when I am running out of ideas and pressed for time. I tried to make it "healthier" by using whole wheat pasta, but I felt like I offset the healthy effect of the grain by using heavy cream. It tasted good, though, so no complaints!


What you need: 

1/2 pound skirt steak
8 oz whole wheat egg noodles
4 cloves of garlic, coarsely minced
1/4 of a Vidalia onion, sliced
1/2 cup beef broth
1/4 cup + 2 tablespoons heavy cream
1 can (6 oz) button mushrooms
2 tablespoons butter
salt and pepper, to taste
dash of dried basil
1 teaspoon corn starch


What to do: 

In a pot, boil beef in lightly salted water for about an hour, or until tender. Save the broth. 

Cook pasta according to package instructions. Drain.

Heat a pan over medium-high and add butter. Saute the garlic and onion in the hot butter for a minute, then add the beef and mushroom. Continue cooking for about 2 to 3 minutes. Reduce heat to medium and pour in broth and 1/4 cup heavy cream.

Meanwhile, dilute the cornstarch in the remaining heavy cream. Mix well. Add mixture to the pot and stir. Season with salt, pepper and basil. Cook for at least 2 more minutes, or until sauce thickens to desired consistency. Ladle sauce on top of prepared noodles. Enjoy!


Tips, Tricks and Tweaks: 

1. Use any type of pasta you have! (I noticed that whole wheat pasta tends to be more dry.)
2. Double the amount if using fresh (chopped) basil.
3. Substitute heavy cream with condensed cream of mushroom soup. It will be thicker, though, so you might have to skip the cornstarch.

2 comments
Labels:

Ginger-Glazed Mahi-Mahi


Did you know that "mahi mahi" is a Hawaiian word meaning "very strong"? The fish itself is known as dolphinfish, but it is not related to dolphin the mammal. I really don't care much about its kins (or lack thereof), all I know was that it was delicious in this dish! 

This recipe was generously adapted from this post. I halved the recipe since I only had two fillets (original recipe called for four). I also tweaked it a bit to suit our preference.


What you need:

2 pcs mahi-mahi fillets
1/2 tablespoon wildflower honey
1/2 tablespoon soy sauce
1/2 tablespoon balsamic vinegar
1 teaspoon fresh ginger root, grated
1 teaspoon + 1 tablespoon extra virgin olive oil, divided
1/2 teaspoon cayenne pepper
salt and pepper, to taste


What to do:

In a bowl, combine honey, soy sauce, balsamic vinegar, ginger, garlic, and 1 teaspoon olive oil. Mix well. Season the mahi-mahi fillets with salt and pepper and place them in the bowl. Cover with plastic wrap and let marinate in the fridge for at least 30 minutes.

Heat 1 tablespoon extra virgin olive oil in a large skillet over medium-high heat. Remove fish from the bowl, reserve the marinade. Fry fish for 4-6 minutes on each side, or until fish flakes easily with a fork. Remove fillets to a serving platter and keep warm.

Pour the reserved marinade into a saucepan and heat over medium until the mixture reduces to a glaze consistency. Spoon glaze over fish and serve imemdiately.


Tips, Tricks and Tweaks:

1. I used wildflower honey because I like the deep sweetness. Feel free to use regular or clover honey if wildflower is not available.
2. Reduce the amount of ginger if it is too strong for you.
3. Too hot? Lessen the cayenne pepper, or skip it altogether.
4. You can use any other white or firm-fleshed fish in this recipe.

1 comments
Labels:

Shamrock

Since I am still feeling the vibe of St. Patrick's Day, I thought I'd post this for you.


When I first saw these growing in our backyard, I thought they were clovers and spent one too many hours trying to look for a lucky four-leafed one. In one patch, however, I saw some flowers sprouting and did some research.


I found out that these shamrock-shaped plants are called Redwood Sorrel (Oxalis Oregana). No wonder I couldn't find a four-leafed one - they were not clovers! Something interesting I learned, though, is that these plants are edible although a bit acidic in taste. I am not one to try - I'll take their word for it!


Clovers - NOT!

4 comments
Labels:

Pandan Puto (St. Patrick's Day edition)


I decided to make green (martian-ish) puto for St. Patrick's Day! It was a happy accident since I didn't mean for it to turn into that deep shade of green. I was just a little bit liberal with the Pandan Extract. It felt like mixing pastel colors and I didn't realize that I was pouring too much.

Puto or steamed rice cake is common fare in the Philippines, and just one of the many ways we utilize rice. It is usually eaten with grated coconut, or by itself. Personally, I love a little bit of saltiness to it, so I put some salted duck eggs on top. 

This recipe is very semi-homemade, as I used a boxed puto mix. One day, I would love to try to make puto using galapong that I would grind from my very own mill. Yeah. Dream on. ;-)


What you need: 

1 pack (half a box) Classic Puto Cake Mix
1/2 cup sugar
5 teaspoons canola oil
2 pieces salted duck eggs, peeled and sliced
1 tablespoon butter 
a few drops of Pandan Extract


What to do: 

Grease puto molds or baking cups with butter. Prepare your steamer by boiling about 3 cups of water or more, depending on the size of your tray.


In a bowl, add 1 cup of water to 1 pack (200 g) puto mix. Blend well for 1 minute using an electric mixer at low speed or with a wooden spatula until smooth.

Add the sugar, canola oil and a few drops of Pandan Extract  gradually while mixing. Continue until batter is smooth and free of lumps, about 1 minute. Pour the batter into prepared baking cups about 3/4 full. Top with sliced salted duck eggs.


Place the baking cups in the steamer and cover with cheese cloth. Steam for about 25 minutes. Puto is done when surface is shiny and bounces back when pressed. 


Tips, Tricks and Tweaks: 

1. You don't have to have puto molds for this recipe - use baking cups or ramekins.
2. I don't recommend mixing it with a wooden spoon. Your arms would probably end up getting tired before the batter even turns smooth. Better use your electic  beater.
3. If you don't have cheesecloth, use aluminum foil. (But really, cheesecloth is a very handy thing to have in the kitchen.)
4. Not a fan of salted duck eggs? Try slices of cheddar cheese. That would also give it a bit of saltiness.

3 comments
Labels:

Better Than Almost Anything Cake

Look at how moist it was...

I baked this cake based on the recommendation of my mother-in-law. She said it was one of the best (if not the best) cake she has ever had. Of course, just the name of the cake itself would make you curious and wonder if it was really "better than almost anything." (By the way, we didn't come up with the name of the cake - Betty Crocker did!).

This cake is semi-homemade, the ingredients are simple and the results are VERY satisfying. It was moist, sweet and delicious! I have to give you a fair warning, though - this cake is a dieter's nightmare! But of course, "no one ever got fat by eating one cookie." So if you have just a slice to satisfy your sweet tooth, it's fine. DON'T eat the entire cake by yourself (although hubby tried!).

This recipe is from Betty Crocker's "Our Best Desserts" compilation.  


What you need: 

1 box German Chocolate cake mix
water, vegetable oil and eggs called for on cake mix box
1 can (14 oz) sweetened condensed milk
1 jar (16 to 17 oz) caramel topping
1 container (8 oz) frozen whipped topping, thawed
1 bag (8 oz) toffee chips (I used Heath) 


What to do: 

Heat oven to 350°F (325°F for dark or nonstick pan). Bake cake as directed on box for 13x9-inch pan.

Poke top of warm cake every half inch with the handle of a wooden spoon. Drizzle milk evenly over the top of the cake; let stand until milk has been absorbed into cake. Drizzle with caramel topping. Run a knife around the sides of the pan to loosen the cake. Cover and refrigerate for about 2 hours or until chilled.

Carefully remove the cake from the pan and place on a cake tray. Spread whipped topping over top of the cake. Sprinkle with toffee chips. Store covered in the fridge. 


Tips, Tricks and Tweaks: 

1. Do not use any other cake mix aside from the German Chocolate. I say so because I found that German Chocolate mix is not as sweet as regular chocolate mix. As you can see, this recipe has a ton of sugar/syrup in it and the milder taste of German Chocolate Cake works perfectly.
2. You can use butterscotch or fudge topping if you're not a big fan of caramel.
3. Substitute toffee bits with butterscotch - it might go well with the caramel!
4. The caramel would be easier to drizzle if it is at room temperature.

3 comments
Labels:

Real Life "Angry Bird"

Look at the size of that tummy!
We saw this cardinal bird chomping on our bird feeder. Our first thought was "wow, can that bird even fly?" It was massive - probably the biggest cardinal we have ever seen. It reminded us of the "Angry Birds" app.

We can only surmise that the cardinal is pregnant - or it has been gorging itself with the seeds on the bird feeder. Either way, I hope it can fly fast enough to dodge predators around. Could it be the same bird from this post a few weeks ago?


1 comments
Labels:

Green Eggs and Ham


Last Wednesday (March 2nd), we celebrated Dr. Seuss' birthday by making green eggs and ham. It was so much fun and the kids loved it! More than the culinary experience they had in school that day, they felt connected to the person who wrote a number of their favorite books - Theodore Seuss Geisel aka Dr. Seuss.

Yes, the eggs looked kinda' Martian-ish, but it was actually just scrambled eggs with a few drops of green food color. The ham were just the usual slices you buy from the deli. Such a simple feast, but the smile on the kids' faces were just priceless. 

The cat in the hat

"Oh, the places you'll go! There is fun to be done! There are points to be scored. There are games to be won!" - From: Oh, The Places You'll Go!

0 comments
Labels: ,

Turkey-Biscuit Pot Pie


This yummy dish was the January feature of the Betty Crocker 2011 calendar. The cooking of this dish turned out to be a family event since my mother-in-law and I did all the prep work, but we had to leave for an errand. We had no choice but to delegate the task of cooking to hubby. Apparently, he was misled when we said "all you had to do is put everything together..."

When we got back, the kitchen looked like it was mildly trashed was spotless, thanks to hubby's cleaning efforts. Even son helped! And to top it all off, the food was ready and waiting for us! It was surreal. Of course, hubby was fuming mad since the "just putting everything together" turned out to be a hundred different things that we conveniently (NOT!) failed to mention. Nonetheless, it was terrific, and probably one of the best turkey pot pies I have ever  had.  


What you need:

For the filling: 

2 1/2 cups baby carrots (12 oz)
2 cups cut-up fresh broccoli
3 tablespoons butter
1/2 cup chopped yellow onion
3 tablespoons all-purpose flour
2 cups chicken broth
1 tablespoon chopped fresh sage leaves
2 cups cubed cooked turkey

For the biscuit: 

4 slices bacon
1 cup Original Bisquick mix
1/2 cup milk
1/2 cup shredded cheddar cheese 


What to do: 

Heat oven to 400°F. In a saucepan, heat 1 cup of water to boiling. Add carrots and broccoli and cook for about 4 minutes or until the veggies are crisp-tender. Drain.

Meanwhile, in a pan or wok, melt butter over medium heat. Add onion and cook for about 2 minutes, stirring occasionally until tender. Add the flour, broth and sage and beat with a whisk. Reduce heat to medium-low; cook for about 5 minutes, stirring occasionally, until sauce thickens. Stir carrots, turkey and broccoli into the sauce. Spoon the turkey mixture into an ungreased 2-quart casserole.

Place bacon strips in a pan and cook until crisp. Let cool, then crumble and set aside. In a medium bowl, combine all the biscuit ingredients and stir just until blended. Spoon this biscuit batter around the edge of the turkey mixture.

Bake for 25 to 30 minutes or until biscuit crust is golden brown. 


Tips, Tricks and Tweaks: 

1. Not a big fan of turkey? Use diced ham or left-over rotisserie chicken!
2. Substitute Bisquick mix with regular pie crust.
3. If using dried sage - just use one teaspoon. Dried herbs are often concentrated and is packed with flavor. (Nothing beats fresh, though)

4 comments
Labels:

Spring is Here!

Yep, spring is here! It is unofficial, though. But you can almost feel it - the weather is gorgeous, the plants are blooming, everything is green and beautiful! Even my grapefruit tree looks lush! (I seriously thought it would die because it shed a lot of its leaves and the branches were very dry). Just as God intended, the plants are back on track and blooming again! I am so thankful that they made it through the frosty winter.


Peek-a-boo! Three grapefruits hiding!
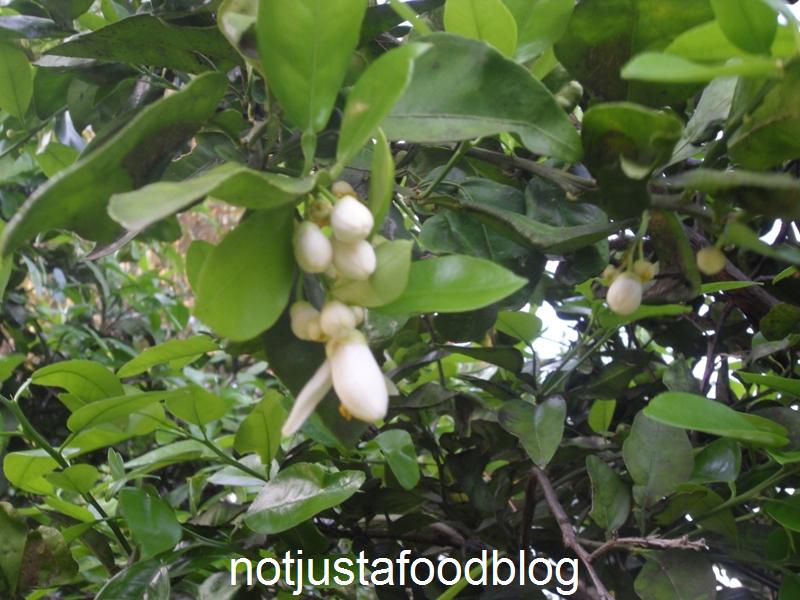
Grapefruit blooms!

Azaleas

Even the birds are back!

A Red-winged Blackbird posing for the camera
Downy Woodpecker

"See! The winter is past; the rains are over and gone! Flowers appear on the earth; the season of singing has come, the cooing of doves is heard in our land. The fig tree forms its early fruit; the blossoming vines spread their fragrance." - Song of Solomon 2:11-13

2 comments
Labels:

Calamansi Sherbet

Eat it quick before it melts! (With buttery Chessmen cookies, of course.)
I still have about a pint of freshly-squeezed calamansi juice so I decided to make sherbet. I recently saw an episode of Unwrapped about Key Lime Pie and it inspired me to make something out of the calamansi juice. The connection is kinda off - calamansi / lime. But hey, they are both sour, citrus fruits. You get the picture.

This recipe is adapted from Marketman's post. I tweaked it a bit by skipping whole milk and using whipping cream. I thought it would make the sherbet creamy and smooth. And it did! Yay!


What you need:

1 3/4 cups sugar
1 cup water, divided
3 tablespoons light corn syrup
1 cup freshly squeezed calamansi
1/2 teaspoon sea salt
1 cup heavy whipping cream


What to do: 

Combine 1/2 cup water, sugar, and corn syrup in a pot. Place over medium heat for about 5 to 10 minutes, or until sugar is dissolved. Remove from heat and cool for 3 hours.

When cooled, add the calamansi juice, 1/2 cup water, salt, and heavy whipping cream. Whisk until well-blended. Cover and refrigerate for at least 4 hours. 

Pour the mixture in your ice cream maker and follow manufacturer's instructions. Place in an air-tight container and freeze for at least 3 hours. Serve with butter cookies.


Tips, Tricks and Tweaks: 

1. If you want a mellower flavor, use 3/4 cup of calamansi juice instead of a whole cup.
2. Substitute corn syrup with simple syrup. Use 1:1 ratio for sugar and water.

3 comments
Labels:

Review: Godiva Strawberry in Milk Chocolate Truffle Bar


The Godiva Chocolate Rewards Club has got to be one of the best clubs to be in. You get a lot of freebies, discounts, and you get to be the first to try their new products. Such as the Strawberry in Milk Chocolate truffle bar.

After sampling this product (launched around Valentine's Day), here are my thoughts: 


What I liked: 

- It has the rich and delicious chocolate that Godiva is known for.
- The truffle bar has the right amount of filling. When I bit into it, the filling didn't run down my finger (like some chocolates do).
- The strawberry filling had the right consistency - not too thick and not too thin.
- It was segmented! The bar has four segments, and each segment has its own filling. Originally, I thought the bar has fillings all through-out. That would have been a very messy eat.


What I didn't like: 

- The strawberry filling is sweet, but not in an overpowering way. I just would have wanted a bit more tanginess to it.
- One bar has 220 calories. Ouch!
- I wish it came in a dark chocolate variety.
- Kinda' pricey. It was $3 for a bar. 


The Verdict: 

I'm not really a fan of chocolate stuffed with anything - I prefer solid chocolate over fancy bonbons anytime. But I like the Strawberry in Milk Chocolate truffle bar by Godiva. It has a good blend of chocolate and strawberry filling, and the chocolate would just melt in your mouth. Nothing extra-ordinarily fantastic, but definitely worth trying. Would I recommend this to a friend? Of course. Would I buy it again? Yes. (It is still cheaper than chocolate-covered strawberries!)   

2 comments
 
Not Just A Food Blog © 2012 | Designed by Canvas Art, in collaboration with Business Listings , Radio stations and Corporate Office Headquarters