Labels: ,

Holiday Baking


There's something about this season that makes me want to bake... I don't know... maybe the delicious treats that my co-workers have been bringing, or the Christmas cartoons that are airing on TV... or maybe thes December 2012 edition of my Food Network Magazine! ;-)


Anyway, I was really not in the mood to cook, and all I can think of is baking some cookies. Coincidentally (or not!), I have some sugar cookie dough in the fridge that are just begging to be made. So I told hubby that I want to bake some cookies, and he shocked me by saying, "Well, I'm also not very hungry. How about we have cookies and coffee for dinner?" I kid you not, at that moment I thought I heard angels singing and I was reminded of why I love hubby so much. :-)

So we ditched our earlier dinner plans of nachos and instead had the sweetest, unhealthiest dinner you can possibly think of. As we were eating, hubby said "It's great to be an adult! We can do and eat whatever we please!" Ah, ain't life grand sweet? 


By the way, I made several kinds - plain sugar cookies, frosted sugar cookies, and Snickerdoodles. Take your pick!

Snickerdoodles action!
On a separate note, I want to thank you guys for always being there. I know I haven't been posting a lot lately - I just can't seem to find time between my school work and a shop. And of course, there's this little matter of having a family to take care of. And a mini-farm to run. Yep, never a dull moment.

And I want to wish you all a Merry Christmas and a Happy New Year!


What you need:

1 pkg (1 pound) sugar cookie dough (I used Pillsbury)

For the Snickerdoodles: 

1 1/2 tablespoons of granulated sugar
1/4 teaspoon ground cinnamon

For Sugar Cookie Frosting:

1/2 cup confectioners sugar
3 tablespoons evaporated milk
1 teaspoon light corn syrup
1/8 teaspoon vanilla


What to do:

Preheat oven to 350°F. Cut cookie dough into 1/2 inch rounds.  Place on cookie sheet lined with parchment paper.

Prepare the Snickerdoodles first. In a small bowl, combine granulated sugar and cinnamon. Mix well. Take several pieces of cookie dough rounds to make Snickerdoodles (I made 6) and roll them in the sugar-cinnamon mixture. Then place them on a separate cookie sheet for baking.

Place in the pre-heated oven and bake for around 12 minutes. Once baked, place on a wire rack to cool.

Meanwhile, make the frosting. In a medium-sized bowl, mix the confectioners sugar and evaporated milk until smooth. Add the corn syrup and vanilla, then beat with an electric mixer until you reach your desired consistency. You may add more milk or sugar depending on how thick you want it. Set aside.

When the cookies have cooled down, start decorating! Using a spatula or even a fork, spread the frosting on top of the cookies. Top with your candy sprinkles of choice. Enjoy!

Tips, Trick and Tweaks:

1. When frosting cookies, make sure they are cooled down - or the frosting will just melt or slide away. No bueno.
2. Work quickly so the frosting doesn't dry out!
3. I used "slice and bake" cookies, but feel free to make yours from scratch. :-)

3 comments
Labels: ,

Soul Sweet 'Taters

Happiness on a dish!
This was the dish I made for our Thanksgiving dinner a few days ago. I am thankful for family and friends that visited, which resulted for a merrier celebration and less dishes to cook (for me, at least!)

Fair warning - this dish is addictive! It is like a side dish and dessert rolled into one! The creaminess of the sweet potatoes combined with the crunch of pecans and brown sugar is sure to send you to tater heaven!  I am telling you - it was gone so fast, I didn't even get the chance to have seconds!

This recipe is from the November 2012 edition of Food Network magazine, from one of my favorite bloggers Ree Drummond. Tweaked, of course, for my family who has a horrible case of sweet tooth (or teeth, for that matter!)


What you need:

4 medium sweet potatoes (about 1 3/4 pounds)
1 cup white sugar
1 cup milk
2 large eggs
1 teaspoon vanilla extract
1 teaspoon salt
1 1/4 cup packed dark brown sugar
1 1/4 cup pecans
1/2 cup all-purpose flour
6 tablespoons unsalted butter, at room temperature


What to do:

Preheat the oven to 375°F. Cover each potato with foil, then place them on the oven rack and bake for about 45 minutes.

When the potatoes are done cooking, let cool for about 5 to 10 minutes. Remove foil then slice them open lengthwise and scrape off the flesh with a spoon into a large bowl.  Increase the oven temperature to 400°F.

Time to cool off!

Add the white sugar, milk, eggs, vanilla and salt to the bowl with the sweet potatoes. Using a potato masher, mash the mixture until combined and slightly lumpy.

Lumpy and bumpy? Yessiree!

In a separate bowl, mash the brown sugar, pecans, flour and butter with a fork until thoroughly combined. The mixture should resemble a crumble.


Yes, my dear friend. That is the pure deliciousness.

Spread the sweet potato mixture in 1 14-cup oval-shaped baking dish and sprinkle the crum mixture on top. Bake for about 30 minutes.

This was how it looked like before going into the oven


Tips, Tricks and Tweaks:

1. Pecans would be the best nut for this job, but I imagine walnuts would also do good. 
2. When sprinkling the top with the crumbles, make sure you cover it evenly - for even yuminess!
3. Instead of 1 cup of milk, try 1/2 cup milk and 1/2 cup heavy cream! 

3 comments
Labels:

Sweet Cinnamon Pumpkin Seeds


Because I hate wasting anything (especially food), I made sure to make something out of the seeds from the pumpkin I used for this bread. 

Truth be told, I never paid much attention to pumpkin seeds because they are common "snacks" in the Philippines - cheap, salty, and readily available. But here, I only see them during the Fall season, and they come in a myriad of flavors and spices! 

I chose to make sweet instead of salty - I have had too many salty pumpkin seeds in my youth! :-) It was delicious - especially when they are still warm from the oven!

By the way, I never knew that the white hull of pumpkin seeds can be eaten. We usually just eat the green part (called pepitas). But yes, apparently they are edible. You might choke a bit when you eat it, but it'll grow on you.

I didn't put any measurements in this recipe - just use as much or as little as you prefer!


What you need:

pumpkin seeds
olive oil
sugar
cinnamon


What to do:

Preheat oven to 300°F.

Wash pumpkin seeds and remove any stringy pulps that are attached.


Drizzle a small amount of olive oil on a baking sheet. Spread the seeds in a single layer on the oiled baking sheet and roast for about 30 minutes to dry them out.


Remove from the oven, toss the seeds with a little bit of olive oil, cinnamon and sugar. Return to the oven and bake until crisp and golden, about 20 more minutes.


Tips, Tricks and Tweaks:

1. Pumpkin seeds are chock-full of minerals, protein and fiber! More reason to eat them!
2. Try Italian spices - instead of cinnamon and sugar, toss with grated parmesan and dried oregano.
3. Did you know that all pumpkin seeds are edible? Yes, including the ones from your jack-o-lanterns.

3 comments
Labels:

Thanksgiving 2012

For our Thanksgiving bulletin board, I created a turkey (yes, I made that turkey from scratch so please pardon the skewed measurements) and had the kids do "something" with the turkey feathers.


I had them write things they are thankful for on a piece of colored construction paper that would later on become the feathers.

We enjoyed reading their answers, as some are quite amusing (no surprise here, they are Kindergarteners) - thankful for their toys, their pets, one even said he is thankful for the holidays. 

Of course, most are thankful for their parents, their families and friends, their school, their health, and all those wonderful answers. Several said they are thankful to God for making everything and for loving us, but one said "I am thankful that Jesus died on the cross for our sins."

Such a poignant thought for a young girl, one that evoked emotions and pride, knowing that our works (as teachers) weren't for naught, and our words didn't fall on deaf ears. It kind of reminded me of the Parable of the Sower (Luke 8:4-15). I went home happier than usual that day. :-)

Anyway, lately some moms in our class have been bringing in adorable goodies (thanks to Pinterest!) to the delight of the kids. Here are some:

Oreo Turkey

Cute Teepee Cones! (Pardon the paper clip on the background haha)

And of course, in the spirit of Thanksgiving, I would like to say that I am thankful to a lot of people (you know who y'all are), for the impact you have in my life and for all that you do. 

Thank you to my readers, my commenters, my followers, and those people that continually read all these things that I write;

And to echo my student - thank you Jesus for dying on the cross for us and redeeming us. There is truly no greater love.

6 comments
Labels:

Chocolate Chip Pumpkin Bread


I finally found time to whip up something from the pumpkin puree I made several days ago. This was a special treat for my class, and they enjoyed every bite of this bread that I baked for them. But of course, who wouldn't? With this much chocolate, it was a sure fire hit!

Oh, and if you scroll down to the bottom of this post, you'd see a cute surprise!


What you need:

1 1/2 cups all-purpose flour
1 1/4 cups chocolate chip
1 cup sugar
1 cup pureed pumpkin
3/4 cups canola oil
1 teaspoon ground cinnamon
1/2 teaspoon salt
1/2 teaspoon baking soda
2 eggs


What to do:

Preheat the oven to 350°F.

In a bowl, combine the flour, cinnamon, salt and baking soda. Mix well. 

In a large bowl, beat the eggs, sugar, pureed pumpkin and oil using low setting. Add the dry ingredients and stir just until moistened. Slowly fold in the chocolate chips in the batter.

Pour batter into a greased 8-in. x 4-in. loaf pan. Bake in the pre-heated oven for 60 to 65 minutes, or until a toothpick inserted near the center comes out clean. Cool for about 10 minutes, then remove from pan to cooling racks.


Tips, Tricks and Tweaks:


1. If you don't want too much chocolate chips, reduce the amount to 3/4 cups.
2. Too oily for you? Use half oil and half apple sauce.
3. To prevent the chocolate chips from sinking to the bottom, toss them in flour before folding into the batter.
4. Add half a teaspoon of vanilla for enhanced flavor.
5. You can also use canned pumpkins for this recipe.

By the way, I want to share with you a sample of this cute "Thanksgiving Hand Print" trivet we made in class. We used acrylic paint and floor tiles. What makes it so special is that the print you see is really the hand print of the child. Such a precious keepsake! I am truly blessed to be teaching in Kindergarten. It is a very special and wonderful time. :-)

From this....                                  to this!
Click for larger image


2 comments
Labels:

Pumpkin Puree


Last week, we used several pumpkins in the classroom as teaching aids. We talked about them, measured them, weighed them, and did all the other fun things that Kindergarteners do. The "funnest" one was when the kids guessed how many seeds were in our big pumpkin. The answers ranged from 1 (no kidding!) to 2 million. 

So since we were so eager to know who won the guessing game, we decided to count the pumpkin seeds. We gave each kid several seeds on a plate to count. Then we added them all up. Needless to say, nobody won. And because the range was so wide, the closest  number was about 300 off. But hey,  they had so much fun and learned some big numbers. That's what counts (no pun intended).

I took one of the small pumpkins home to bake something for the kids. But first, I had to puree the pumpkin! I combined two of my favorite blogs' pumpkin pureeing methods - Peachy's and Ree's. :-)


What you need:

1 pie pumpkin
about a cup of water


What to do:

Preheat oven to 350°F. 

Wash the pumpkin and dry. Cut the top off, remove the seeds, then slice the pumpkin into smaller pieces. Don't throw the seeds away - we will turn them into a yummy snack later!

Place the sliced pumpkin pieces in an oven-safe pan. Pour water (at least enough to cover the bottom of the pan) and bake in the pre-heated oven for about 45 minutes, or until pumpkins are fork tender. 

Yes, the holes are where I poked them!

Remove the skins by gently peeling off with a knife. If you baked it correctly, the skin would easily peel off.

What a "peel"-ing!
Place peeled pieces in a blender or food processor. Pulse several times until pumpkin is smooth. Transfer to an air-tight container. Voila! Home-made pumpkin puree!


Tips, Tricks and Tweaks:

1. You can also bake it without water - just keep an eye on it as it might burn!
2. When pulsing in a food pro, add a teaspoon or two of water if it seems dry.
3. Pureed pumpkins would last for several months in the freezer!

4 comments
Labels: ,

Tostones

We love it a bit burned!

This is one side dish that has become a staple in my house. Tostones is traditionally unripe plantains that are sliced thin and fried. I have seen so many ways to prepare this - the most popular is frying it twice and using a tostonera, but being the weird unique family that we are, we enjoy it a different way - instead of unripe, we actually enjoy it VERY ripe. Sort of like "black plantain" ripe.

So yes, I buy the blackest plantains I can find, and actually let them sit on the counter for a few more days before I use them. The reason is that ripe plantains (or bananas, for that matter) have more sugar content, making for a yummier treat. 

This dish was an "accidental" one, as it was originally a failed attempt to make plantain chips, the salty ones that you eat with pico de gallo. After realizing that we like ripe ones better, we switched and never looked back. ;-)


What you need:

very ripe plantains
Canola oil for frying


What to do:


Slice plantains into coins, about a quarter of an inch thick. Place on top of parchment or wax paper, then cover with another piece of parchment/wax. Gently pound with a flat item (in my case, the sides of my meat tenderizer!) until slightly flat. Continue doing so until you have used up all your plantains.


Meanwhile, heat a pan with canola oil over medium heat. Fry flattened plantains for about a minute, then turn over to fry the other side. Drain on a rack and enjoy!


Tips, Tricks and Tweaks:

1. Do not pound too hard - or else you're gonna have mush! Just enough for the plantain to be flattened a bit.
2. You can also place the sliced plantains inside a resealable bag when pounding. Easier cleanup!
3. Oil must be enough to cover at least half the surface of the plantains. If you have a deep fryer, that is better!
4. Let fried plantains sit for about 2 minutes to cool and harden a bit.

4 comments
Labels: ,

Tortang Talong (Eggplant Omelette)


I had to drive a long way just to get these Japanese eggplants. See, I have been craving for tortang talong (eggplant omelette), but it doesn't seem right to make it with the eggplants aubergines that are available in the local markets here. They are either humongous and fat, or pudgy and fat. They probably taste the same, but I didn't think I would have the right meat-to-eggplant ratio if I use them. 

So when I saw these Japanese eggplants in the Oriental store, I grabbed a pack of 3. I figured I could finally have my omelette, and possibly an extra piece to grill (another one of my favorites!).  

This recipe of eggplant omelette is easy to make and delicious. Dipped in (banana) catsup, it "hits the spot!"


What you need:

2 eggplants
1 pound ground pork
2 eggs
1/2 green bell pepper
1/4 of a large Vidalia onion
5 cloves of garlic, minced
1 tablespoon soy sauce
salt and pepper, to taste
olive oil (for frying)


What to do:

Grill eggplants until skin is almost burnt and peeling off. Let cool on a rack. When it is cool enough to touch, remove skin. Flatten the grilled eggplant with a fork.


In a flat container, beat the eggs. Season with a bit of salt and pepper. Lay the flattened eggplant on top of the beaten eggs.


Meanwhile, heat about a teaspoon of olive oil in a wok. Saute garlic, onion and bell pepper. Add ground pork and cook till brown. Season with soy sauce. Set aside.

Heat a large flat pan over medium-high. Add about a tablespoon of olive oil. Remove eggplant from beaten eggs and place into hot oil. Put some of the ground pork mixture on top of the eggplant. Cook for about a minute or two, then turn over so the other side would be cooked. Remove from heat. Enjoy with hot rice and your favorite condiment.


Yes, this is how your pan would look like too! ;-)

Tips, Tricks and Tweaks:

1. Do not cut off the top of the eggplant. It is actually very useful in handling and transferring the eggplant!
2. Use a wide spatula to put the flattened eggplant into the pan. 
3. Don't flatten the eggplant too much. You're making omelette - not baba ghanoush!
4. Eggplants tend to soak up a lot of oil so don't use a lot!

6 comments
Labels:

Chicken Updates

Time for some chicken updates! As of today, we think we have 5 layers. It is very exciting to go to the coop to collect eggs! These chickens are hilarious - watching them is so much fun! There's really never a dull moment in the ranch!

These hawks are always flying around. Makes me nervous, actually. I am afraid they would swoop down and snatch one of the chickens!


Funny picture taken by hubby. It looks like the chicken wants to be in the frame!


The ladder provides them with exercise and entertainment! In this picture, she's showing everyone who's "top chick."


This is how they get up in the morning. They make a beeline for the door and start the day!

3 comments
Labels: ,

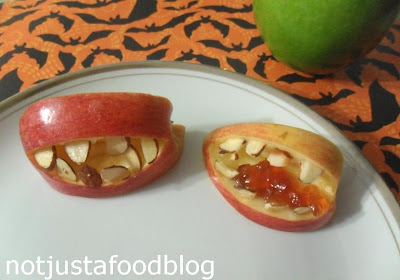
Scary Apple Mouths


How funny is it that after posting some cute smiling apples, I am now doing Scary Apples! Of course it helps that apples are in season and are cheaper than normal! 

Anyway, I thought the idea was cute when I saw it on the October 2012 edition of Food Network Magazine. And since I have all the ingredients, I gave it a try!


What you need:

1 apple
about a tablespoon of sliced almonds
strawberry jelly (optional)
lemon juice (optional)


What to do:

Cut a red apple in quarters and brush with lemon juice. Cut out a wedge from the skin side of each piece. Fill with strawberry jelly and insert sliced almonds to resemble teeth.


Tips, Tricks and Tweaks:

1. Original recipe called for peanut butter, but I opted to use strawberry jelly.
2. Don't have sliced almonds? Try pepitas (squash seeds).
3. Lemon juice is used so the fruit won't brown easily. You can skip it, but you have to eat the fruit almost immediately.


1 comments
Labels:

Smiling Apples


Thanks to my friend Peachkins for this cute inspiration! I told son that we were gonna make smiling apples with marshmallows and peanut butter but he had a different idea - he wanted caramel instead!

So I put a little twist in my smiling apples and used caramel butterscotch topping and it turned out extremely good. Well, maybe just a bit sticky and hard to eat since the darn marshmallows kept sliding! I am thinking that had I used real caramel instead of  syrup, it would have better in keeping the marshmallows from sliding. But I didn't want to buy caramel just for an afternoon snack. I would save that for when we make caramel apples again.  

Oh, and here is a link for Peachkin's cute creations!


What you need:

1 apple
about a cup of marshmallows (regular-sized)
squirts of caramel or butterscotch topping


What to do:

Wash the apple and dry with paper towels. Slice in thin wedges.

Place a wedge of apple on your plate, then squirt a small amount of butterscotch syrup on the side facing you. Immediately line marshmallows on top of the syrup.

Get another wedge of apple and put butterscotch syrup on the bottom side. Place it on top of the marshmallows to resemble a smile.

Continue doing procedure until you run out of ingredients (or patience!).


Tips, Tricks and Tweaks:

1. I used Red Delicious apples because the color resembles human lips. Feel free to use any kind!
2. To avoid apple discoloration, squeeze some fresh lime or lemon juice on them.
3. Use real caramel or peanut butter to make the marshmallows stick.

P.S. It is almost Halloween! Head out to my shop to get your Halloween cards!


4 comments
Labels: ,

Capellini with Vodka Cream Sauce


So we were in the supermarket the other night and I saw hubby looking at a bottle of vodka sauce. It was rather interesting, I have never heard of "vodka sauce" in my whole life, and looking at the bottle, I thought it looked like crab fat (aligue). It was orange-y in color, not your typical red spaghetti sauce.

Needless to say, we were cooking it a few days later. Hubby just wouldn't stop talking about it (I promise, he was relentless) and I was also curious of the taste, so it was a win-win.

It was really delicious - and it reunited me with one of my favorite ingredients - shrimp! Yes, we are having shrimp again (cue music: O happy day!). Our self-imposed seafood ban has been lifted and I am now a happy camper! But enough about the shrimp - the sauce of this dish was the real star of the show. Try it! 


What you need:

1/4 of a large Vidalia onion, chopped
4 cloves of garlic, minced
3 tablespoons extra virgin olive oil, divided
1 cup Vodka

1 cup chicken broth
1 (28 oz) can crushed tomatoes
1/2 cup heavy cream
dash of red pepper flakes
1/2 pound shrimp, peeled and deveined
salt and pepper, to taste
fresh basil for garnish
cooked capellini (angel hair pasta) 


What to do:

Heat olive oil over medium heat in a pot. Saute garlic and onion for about a minute, then very slowly pour in the vodka and simmer over low heat. When vodka is reduced to half the amount (about 2 to 3 minutes), add chicken broth and cook for about a minute. 


Add in crushed tomatoes, whipped cream, then season with salt, pepper, and red pepper flakes. Let cook for another 2 to 3 minutes, or until heated through.

The heavy cream gives the sauce its orange-y hue
Meanwhile, cook pasta according to package directions. Drain and set aside.

Saute shrimps in 1 tablespoon of extra virgin olive oil over medium heat until they turn pink. Set aside.

Place cooked noodles into plate. Top with vodka sauce. Garnish with shrimps and freshly torn basil. 


Tips, Tricks and Tweaks:

1. Try using scallops or Italian sausage instead f shrimp.
2. There are so many ways of cooking this, some even add vodka after tomatoes and such. I prefer to cook it this way so as to cook off most of the alcohol content in the vodka.
3. This would also be good with penne or other thicker type pasta.
4. If you let the sauce simmer longer, it would be more flavorful!


5 comments
Labels:

Tempura Fish


After what seems to be long hiatus, my blog is back! And I will try my best to update it regularly! Today's offering is yet another version of fish and chips. I know it is not very healthy (fried fish and fried potatoes!) but every once in a while, I give in. It is fish, after all. Think of all the omega-3 fatty acids that we're gonna take in! Kidding aside, the real reason of this dish was that hubby was on a "tempura kick" and he wanted everything dipped in it!

As the title suggested, there was nothing really fancy about this dish. Just fish in tempura batter. I tried fish with cornmeal, parmesan, mushroom, etc - so why not with Tempura? I love how tempura keeps food light and very crunchy!


What you need:

3 haddock fillets, cut in small pieces
Old Bay seasoning
Tempura mix
Canola Oil, for cooking


What to do:

Season both sides of fish pieces with Old Bay seasoning. Set aside.

Fish seasoned with Old Bay

In a frying pan, heat about 1/4 cup of oil (more or less, depending on the depth of your pan) over medium heat. 

Make tempura batter according to package instructions. Make sure you put the batter bowl over ice to help keep it cool. It will make for a crispier texture.

Dip fish pieces into the tempura batter, making sure the whole surface is covered. Transfer fish to hot oil and fry until golden brown. Place on paper towels or newspaper to drain oil. Serve with french fries and malted vinegar. Enjoy!

 
Tips, Tricks and Tweaks:

1. Not a fan of Old Bay seasoning? Just use salt and pepper.
2. Do not overfry! The fish would be chewy.
3. Use your leftover fish in fish tacos! Yummy!
4. If you are left with more batter than fish, use it with veggies! I recommend red peppers! 
5. When making the batter, do not over mix! It will activate gluten and will make the batter chewy. Not good! :-(

4 comments
 
Not Just A Food Blog © 2012 | Designed by Canvas Art, in collaboration with Business Listings , Radio stations and Corporate Office Headquarters