Labels:

Easy Tender Pork Roast


If you are a regular reader of this blog, you would know that "we love the pig." In fact, I think I have more pork dishes than all the other categories combined (NOT!). We love the pig so much that we decided to make beef roast but use pork instead hahaha. No, seriously. This is originally my mother-in-law's beef roast recipe. I just copied it and used pork in lieu of beef. :-)


What you need:

4 to 5 pounds pork loin
14 oz chicken broth
1/2 cup Dale's seasoning 
3 garlic cloves, minced
2 teaspoons ground black pepper


What to do:

Place pork in your slow cooker or Crock Pot.  Add broth.

Using a fork, poke roast to create little pockets or holes. Place pork in your slow cooker or Crock Pot. Pour in broth, Dale's seasoning and let meat absorb it. Sprinkle minced garlic and pepper.

Cook on low for 8 to 10 hours. 

Enjoy!


Tips, Tricks and Tweaks:

1. I know, it is a loooong time to wait. But it makes the meat really tender. If you are pressed for time, cook using medium heat for about 6 to 7 hours.
2. If you are a garlic lover like me, add garlic powder!
3. Best served with veggies and mashed potatoes!

1 comments
Labels:

Beef Bulgogi


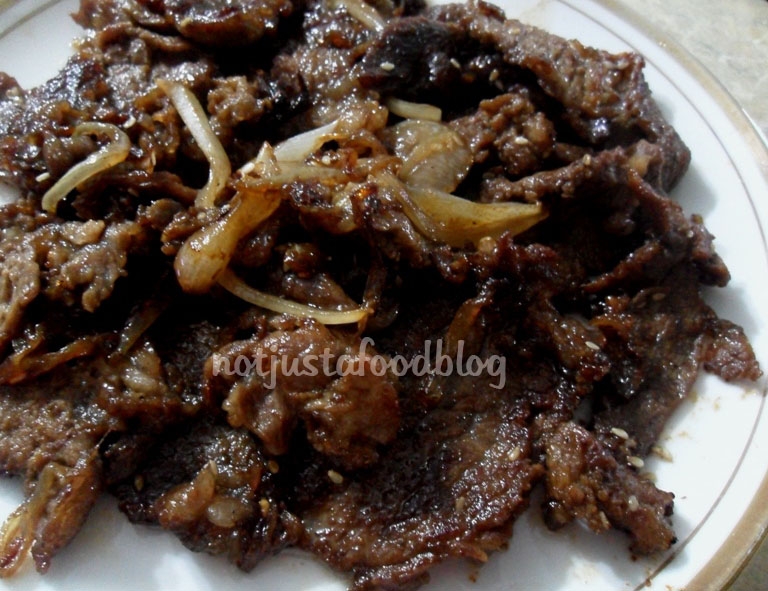
This is an attempt to copy my mother's Beef Bulgogi. When we had it "mom's way," beef bulgogi was wrapped in lettuce leaves and was eaten as an appetizer of sorts. I wanted it to be the "star" of dinner so I served it as the main course - along with rice, of course!

This recipe is a bit sweet, but the steamed rice pairing tones the flavor down and gives you a hint of sweet and a hint of savory. I think I like it better than the store-bought sauces - I control the ingredients I put, and less chemicals. Yay!


What you need:

1 pound top round steak, sliced thin 
1/2 Vidalia onion, cut in rings
1 mandarin orange fruit cup
1/2 cup soy sauce
1/4 to 1/2 cup sugar (depending on your taste)
3 cups of water
3 tablespoons pineapple juice
3 tablespoons cooking wine
1/4 teaspoon garlic powder
1/2 teaspoon pepper
2 tablespoons sesame oil
1 teaspoon toasted sesame seeds
canola oil for frying


What to do:

Easy peasy! Just combine all ingredients except  the canola oil. Mix well. Let marinate for a minimum of 30 minutes. Overnight is better!

Heat about a tablespoon of canola oil in a non-stick pan. Fry the beef slices until slightly brown. Pour in about a third of the marinade and cook for a few minutes more. Remove from heat and serve with rice.


Tips, Tricks and Tweaks:

1. I used a fruit cup because I didn't have oranges. Use fresh ones if you have any.
2. Cooking wine works great, but sake gives it a better flavor.
3. Green onions are also great in this dish!
4.  I originally used 1/2 cup sugar in this recipe but found it a bit too sweet. Cut down a bit, or try the sweet version!  :-)

2 comments
Labels:

Boogertown!


Yep, this is a real place. It is actually Boogertown Road, somewhere in Sevierville, Tennessee. We were there for short vacation, and one of the highlights of our trip is taking a picture of that sign. My brother-in-law had to stop the car long enough for me to get a clear picture. (Thanks, A!)

Now, before you start making assumptions, Boogertown is not about boogers. Well... it is, but in a different kind. According to my brother-in-law, the road is named after ghosts or "boogers", a term used in the 19th century. I would want to think that the word "booger" is the pre-cursor of the term "boogeyman" we use nowadays. :-)

Let me tell you, I love Tennessee... the snow, the tourist traps (haha), the beautiful mountains... but I don't think I would be comfortable driving there. The winding roads made me carsick (we stayed in a house on top of a mountain) and I always had to have a sucker to keep me from throwing up. But please, don't let me hinder you from visiting. Everything is gorgeous, from the quaint candy kitchen shops, to the big "dinner and show" buildings. There is always something to do there.

In our case, we threw snowballs at each other! :-)


0 comments
Labels:

Avocado & Spinach Salad with Warm Citrus Vinaigrette


Happy New Year, friends! And because like 80% of the country, our New Year's resolution is also to eat healthier, I want to start the year with a veggie post. 

Hubby and I both love this salad because of the avocado. Growing up, I always considered avocado as a fruit. Never in my wildest dreams would I think of putting it in savory dishes. Well, imagine my shock when I found out that here in the States, it is the other way around. People would give me strange looks when I suggest they dip their slice of avocado in sugar. Or the "she-eats-strange-things, she's-Asian" stare when I tell them to add milk to it. Funny how one thing can be seen so differently in another place.

I like to think that I have the best of both worlds. I enjoy avocado as a fruit and as a vegetable. Although in this case, I really didn't care. All I knew is that it went well with the salad and it was delicious.

I got the recipe from the Dec/January 2013 edition of Publix Family Style magazine. I tweaked it to use the ingredients we have on hand.

Taking the leaves for a wild ride! Thanks, MIL for my salad spinner!

What you need:

6 cups baby spinach leaves, rinsed and drained
2 medium ripe avocados, peeled, seeded and sliced in wedges
2 ounces crumbled feta cheese
1/4 cup extra virgin olive oil
1/4 cup freshly squeezed orange juice
3 tablespoons freshly squeezed lemon juice
1 tablespoon white vinegar
1 teaspoon sugar
1/2 teaspoon kosher salt
1/4 teaspoon ground black pepper
1/4 cup pine nuts
several pieces of blackberries, sliced


What to do:

In a large bowl, combine the spinach, avocados, and feta cheese. Spoon onto plates.

In a small saucepan over medium-low heat, combine olive oil, orange juice, lemon juice, vinegar, sugar, salt and pepper. Heat for about 3 to 4 minutes, until the dressing is combined and warm but not hot. Drizzle the dressing over the salads. Top with pine nuts and blackberries. Serve immediately.


Tips, Tricks and Tweaks:

1. Use apple cider vinegar instead of white vinegar. It will give the dressing a deep, sweet taste.
2. You can also top it with finely shredded lemon peel.
3. Don't like avocado? Try it with hard boiled eggs.
4. We like feta, but you can also use gorgonzola cheese on this dish.


3 comments
Labels: ,

Holiday Baking


There's something about this season that makes me want to bake... I don't know... maybe the delicious treats that my co-workers have been bringing, or the Christmas cartoons that are airing on TV... or maybe thes December 2012 edition of my Food Network Magazine! ;-)


Anyway, I was really not in the mood to cook, and all I can think of is baking some cookies. Coincidentally (or not!), I have some sugar cookie dough in the fridge that are just begging to be made. So I told hubby that I want to bake some cookies, and he shocked me by saying, "Well, I'm also not very hungry. How about we have cookies and coffee for dinner?" I kid you not, at that moment I thought I heard angels singing and I was reminded of why I love hubby so much. :-)

So we ditched our earlier dinner plans of nachos and instead had the sweetest, unhealthiest dinner you can possibly think of. As we were eating, hubby said "It's great to be an adult! We can do and eat whatever we please!" Ah, ain't life grand sweet? 


By the way, I made several kinds - plain sugar cookies, frosted sugar cookies, and Snickerdoodles. Take your pick!

Snickerdoodles action!
On a separate note, I want to thank you guys for always being there. I know I haven't been posting a lot lately - I just can't seem to find time between my school work and a shop. And of course, there's this little matter of having a family to take care of. And a mini-farm to run. Yep, never a dull moment.

And I want to wish you all a Merry Christmas and a Happy New Year!


What you need:

1 pkg (1 pound) sugar cookie dough (I used Pillsbury)

For the Snickerdoodles: 

1 1/2 tablespoons of granulated sugar
1/4 teaspoon ground cinnamon

For Sugar Cookie Frosting:

1/2 cup confectioners sugar
3 tablespoons evaporated milk
1 teaspoon light corn syrup
1/8 teaspoon vanilla


What to do:

Preheat oven to 350°F. Cut cookie dough into 1/2 inch rounds.  Place on cookie sheet lined with parchment paper.

Prepare the Snickerdoodles first. In a small bowl, combine granulated sugar and cinnamon. Mix well. Take several pieces of cookie dough rounds to make Snickerdoodles (I made 6) and roll them in the sugar-cinnamon mixture. Then place them on a separate cookie sheet for baking.

Place in the pre-heated oven and bake for around 12 minutes. Once baked, place on a wire rack to cool.

Meanwhile, make the frosting. In a medium-sized bowl, mix the confectioners sugar and evaporated milk until smooth. Add the corn syrup and vanilla, then beat with an electric mixer until you reach your desired consistency. You may add more milk or sugar depending on how thick you want it. Set aside.

When the cookies have cooled down, start decorating! Using a spatula or even a fork, spread the frosting on top of the cookies. Top with your candy sprinkles of choice. Enjoy!

Tips, Trick and Tweaks:

1. When frosting cookies, make sure they are cooled down - or the frosting will just melt or slide away. No bueno.
2. Work quickly so the frosting doesn't dry out!
3. I used "slice and bake" cookies, but feel free to make yours from scratch. :-)

3 comments
Labels: ,

Soul Sweet 'Taters

Happiness on a dish!
This was the dish I made for our Thanksgiving dinner a few days ago. I am thankful for family and friends that visited, which resulted for a merrier celebration and less dishes to cook (for me, at least!)

Fair warning - this dish is addictive! It is like a side dish and dessert rolled into one! The creaminess of the sweet potatoes combined with the crunch of pecans and brown sugar is sure to send you to tater heaven!  I am telling you - it was gone so fast, I didn't even get the chance to have seconds!

This recipe is from the November 2012 edition of Food Network magazine, from one of my favorite bloggers Ree Drummond. Tweaked, of course, for my family who has a horrible case of sweet tooth (or teeth, for that matter!)


What you need:

4 medium sweet potatoes (about 1 3/4 pounds)
1 cup white sugar
1 cup milk
2 large eggs
1 teaspoon vanilla extract
1 teaspoon salt
1 1/4 cup packed dark brown sugar
1 1/4 cup pecans
1/2 cup all-purpose flour
6 tablespoons unsalted butter, at room temperature


What to do:

Preheat the oven to 375°F. Cover each potato with foil, then place them on the oven rack and bake for about 45 minutes.

When the potatoes are done cooking, let cool for about 5 to 10 minutes. Remove foil then slice them open lengthwise and scrape off the flesh with a spoon into a large bowl.  Increase the oven temperature to 400°F.

Time to cool off!

Add the white sugar, milk, eggs, vanilla and salt to the bowl with the sweet potatoes. Using a potato masher, mash the mixture until combined and slightly lumpy.

Lumpy and bumpy? Yessiree!

In a separate bowl, mash the brown sugar, pecans, flour and butter with a fork until thoroughly combined. The mixture should resemble a crumble.


Yes, my dear friend. That is the pure deliciousness.

Spread the sweet potato mixture in 1 14-cup oval-shaped baking dish and sprinkle the crum mixture on top. Bake for about 30 minutes.

This was how it looked like before going into the oven


Tips, Tricks and Tweaks:

1. Pecans would be the best nut for this job, but I imagine walnuts would also do good. 
2. When sprinkling the top with the crumbles, make sure you cover it evenly - for even yuminess!
3. Instead of 1 cup of milk, try 1/2 cup milk and 1/2 cup heavy cream! 

3 comments
Labels:

Sweet Cinnamon Pumpkin Seeds


Because I hate wasting anything (especially food), I made sure to make something out of the seeds from the pumpkin I used for this bread. 

Truth be told, I never paid much attention to pumpkin seeds because they are common "snacks" in the Philippines - cheap, salty, and readily available. But here, I only see them during the Fall season, and they come in a myriad of flavors and spices! 

I chose to make sweet instead of salty - I have had too many salty pumpkin seeds in my youth! :-) It was delicious - especially when they are still warm from the oven!

By the way, I never knew that the white hull of pumpkin seeds can be eaten. We usually just eat the green part (called pepitas). But yes, apparently they are edible. You might choke a bit when you eat it, but it'll grow on you.

I didn't put any measurements in this recipe - just use as much or as little as you prefer!


What you need:

pumpkin seeds
olive oil
sugar
cinnamon


What to do:

Preheat oven to 300°F.

Wash pumpkin seeds and remove any stringy pulps that are attached.


Drizzle a small amount of olive oil on a baking sheet. Spread the seeds in a single layer on the oiled baking sheet and roast for about 30 minutes to dry them out.


Remove from the oven, toss the seeds with a little bit of olive oil, cinnamon and sugar. Return to the oven and bake until crisp and golden, about 20 more minutes.


Tips, Tricks and Tweaks:

1. Pumpkin seeds are chock-full of minerals, protein and fiber! More reason to eat them!
2. Try Italian spices - instead of cinnamon and sugar, toss with grated parmesan and dried oregano.
3. Did you know that all pumpkin seeds are edible? Yes, including the ones from your jack-o-lanterns.

3 comments
Labels:

Thanksgiving 2012

For our Thanksgiving bulletin board, I created a turkey (yes, I made that turkey from scratch so please pardon the skewed measurements) and had the kids do "something" with the turkey feathers.


I had them write things they are thankful for on a piece of colored construction paper that would later on become the feathers.

We enjoyed reading their answers, as some are quite amusing (no surprise here, they are Kindergarteners) - thankful for their toys, their pets, one even said he is thankful for the holidays. 

Of course, most are thankful for their parents, their families and friends, their school, their health, and all those wonderful answers. Several said they are thankful to God for making everything and for loving us, but one said "I am thankful that Jesus died on the cross for our sins."

Such a poignant thought for a young girl, one that evoked emotions and pride, knowing that our works (as teachers) weren't for naught, and our words didn't fall on deaf ears. It kind of reminded me of the Parable of the Sower (Luke 8:4-15). I went home happier than usual that day. :-)

Anyway, lately some moms in our class have been bringing in adorable goodies (thanks to Pinterest!) to the delight of the kids. Here are some:

Oreo Turkey

Cute Teepee Cones! (Pardon the paper clip on the background haha)

And of course, in the spirit of Thanksgiving, I would like to say that I am thankful to a lot of people (you know who y'all are), for the impact you have in my life and for all that you do. 

Thank you to my readers, my commenters, my followers, and those people that continually read all these things that I write;

And to echo my student - thank you Jesus for dying on the cross for us and redeeming us. There is truly no greater love.

6 comments
Labels:

Chocolate Chip Pumpkin Bread


I finally found time to whip up something from the pumpkin puree I made several days ago. This was a special treat for my class, and they enjoyed every bite of this bread that I baked for them. But of course, who wouldn't? With this much chocolate, it was a sure fire hit!

Oh, and if you scroll down to the bottom of this post, you'd see a cute surprise!


What you need:

1 1/2 cups all-purpose flour
1 1/4 cups chocolate chip
1 cup sugar
1 cup pureed pumpkin
3/4 cups canola oil
1 teaspoon ground cinnamon
1/2 teaspoon salt
1/2 teaspoon baking soda
2 eggs


What to do:

Preheat the oven to 350°F.

In a bowl, combine the flour, cinnamon, salt and baking soda. Mix well. 

In a large bowl, beat the eggs, sugar, pureed pumpkin and oil using low setting. Add the dry ingredients and stir just until moistened. Slowly fold in the chocolate chips in the batter.

Pour batter into a greased 8-in. x 4-in. loaf pan. Bake in the pre-heated oven for 60 to 65 minutes, or until a toothpick inserted near the center comes out clean. Cool for about 10 minutes, then remove from pan to cooling racks.


Tips, Tricks and Tweaks:


1. If you don't want too much chocolate chips, reduce the amount to 3/4 cups.
2. Too oily for you? Use half oil and half apple sauce.
3. To prevent the chocolate chips from sinking to the bottom, toss them in flour before folding into the batter.
4. Add half a teaspoon of vanilla for enhanced flavor.
5. You can also use canned pumpkins for this recipe.

By the way, I want to share with you a sample of this cute "Thanksgiving Hand Print" trivet we made in class. We used acrylic paint and floor tiles. What makes it so special is that the print you see is really the hand print of the child. Such a precious keepsake! I am truly blessed to be teaching in Kindergarten. It is a very special and wonderful time. :-)

From this....                                  to this!
Click for larger image


2 comments
Labels:

Pumpkin Puree


Last week, we used several pumpkins in the classroom as teaching aids. We talked about them, measured them, weighed them, and did all the other fun things that Kindergarteners do. The "funnest" one was when the kids guessed how many seeds were in our big pumpkin. The answers ranged from 1 (no kidding!) to 2 million. 

So since we were so eager to know who won the guessing game, we decided to count the pumpkin seeds. We gave each kid several seeds on a plate to count. Then we added them all up. Needless to say, nobody won. And because the range was so wide, the closest  number was about 300 off. But hey,  they had so much fun and learned some big numbers. That's what counts (no pun intended).

I took one of the small pumpkins home to bake something for the kids. But first, I had to puree the pumpkin! I combined two of my favorite blogs' pumpkin pureeing methods - Peachy's and Ree's. :-)


What you need:

1 pie pumpkin
about a cup of water


What to do:

Preheat oven to 350°F. 

Wash the pumpkin and dry. Cut the top off, remove the seeds, then slice the pumpkin into smaller pieces. Don't throw the seeds away - we will turn them into a yummy snack later!

Place the sliced pumpkin pieces in an oven-safe pan. Pour water (at least enough to cover the bottom of the pan) and bake in the pre-heated oven for about 45 minutes, or until pumpkins are fork tender. 

Yes, the holes are where I poked them!

Remove the skins by gently peeling off with a knife. If you baked it correctly, the skin would easily peel off.

What a "peel"-ing!
Place peeled pieces in a blender or food processor. Pulse several times until pumpkin is smooth. Transfer to an air-tight container. Voila! Home-made pumpkin puree!


Tips, Tricks and Tweaks:

1. You can also bake it without water - just keep an eye on it as it might burn!
2. When pulsing in a food pro, add a teaspoon or two of water if it seems dry.
3. Pureed pumpkins would last for several months in the freezer!

4 comments
 
Not Just A Food Blog © 2012 | Designed by Canvas Art, in collaboration with Business Listings , Radio stations and Corporate Office Headquarters